
|
|
When making tarts, the crust takes on greater importance than it does, say, with a pie, (although it's pretty important there, too). The tart crust may be more cookie-like in sweet tarts, and more like a flavorful shortbread in savory tarts. Match the tart's main message with a complementary crust choice.
Types of Crusts - There are many different types of crusts all based on the basics: flour, salt, butter, (or other fat), and water. Variations come in the form of differing proportions, or enrichments of sugar, egg, and flavorings.
 Basic Shortcrust - Basic Shortcrust - This basic crust typically uses just flour, salt, butter/shortening, and water.
Rich Shortcrust - This crust includes egg yolks in the flour, salt, butter/shortening, and water base.
Pâte Brisée - This traditional French crust version is enriched with egg yolks and has a greater proportion of butter than a shortcrust pastry.
Pâte Sucrée - Similar to pâte brisée, this crust has the addition of powdered sugar for added sweetness along with a bit of vanilla.
From a basic crust recipe, additions such as, lemon zest, herbs, ground almonds, and so on, add nice dimension to a tart. Leave your guests curious and asking, 'What's in that crust?'
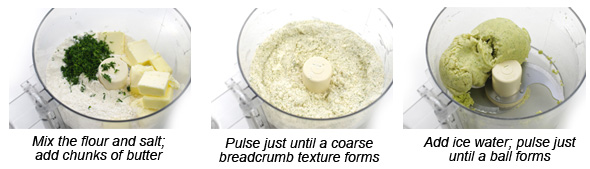
Making Great Crusts -- Good crusts are all about creating pockets of air betwixt and between layers of flour. Butter seems to be the fat of choice for tarts. The flour and butter are blended together with the flour encasing the bits of butter. Achieving a "breadcrumb" consistency is crucial; avoid mixing the flour and butter too much. When the crust bakes, the small particles of butter melt creating the desired air pockets and layers.
Key Steps for Exceptional Tart Crusts
1. Keep it Cool - A cool temperature during crust-making is key to keeping the butter from melting. Start with very cold butter. Handle it with your hands (a.k.a. heat machines) as little as possible, and allow the dough to chill at various stages.
2. Use a Food Processor - This appliance is our preferred method for making crusts. The blade cuts the flour and butter together quickly returning a perfectly sized breadcrumb texture with just a few pulses. The speed at which this happens allows the butter to keep its chill. Mix the salt and flour together well prior to adding the butter.
 3. Add Cold Water --
 While the dough may be pliable and have a good consistency with just the flour and butter, add the water. The water inspires the glutens in the flour and forms a stronger micro-structure. Allow the dough to rest so that the glutens have a chance to form.
4. Chill Out Regularly - Once a ball of dough is formed, flatten it into a disk and chill in the refrigerator. This serves two purposes - the butter's temperature is kept low, and the flour has a chance to change character. After the crust is rolled out and placed, chill the lined tart pans again prior to baking.
|
| |
A KEY TART TECHNIQUE - BLIND BAKING CRUSTS |
Blind baking a tart or pie crust is an essential technique to know and master. This technique is used when a no-bake tart filling is chosen, or when a partially-baked crust is needed. Follow these steps to blind bake a crust:
 1. Line the Pan with the Crust Dough - Tarts typically have a thinner crust than a pie - more toward a 1/8-inch thickness. Lap the crust over your rolling pin and unfurl it on top of your tart pan. Finesse the crust into place beginning with the middle of the pan. Make sure the crust fits snugly into the edge of the pan by pressing the dough against the bottom edge and sides. 1. Line the Pan with the Crust Dough - Tarts typically have a thinner crust than a pie - more toward a 1/8-inch thickness. Lap the crust over your rolling pin and unfurl it on top of your tart pan. Finesse the crust into place beginning with the middle of the pan. Make sure the crust fits snugly into the edge of the pan by pressing the dough against the bottom edge and sides.
2. Trim the Edge - Cut any excess dough away from the edge with the dull edge of a knife or by carefully pressing the rolling pin across the top of the tart pan. Unlike a pie crust, no pinching or manual edge work is needed.
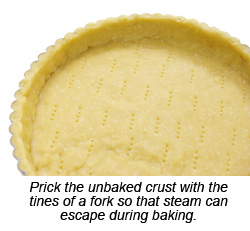
3. Make Escape Holes - When the crust bakes, steam is formed. Using a fork, prick holes in the bottom of the crust before baking so that the steam can escape easily.
 4. Chill Out - Chill the crust in the refrigerator or freezer for at least 15 minutes. This allows the butter to harden again, and the crust to stiffen prior to baking. If the crust is not allowed to chill at this stage, it will slump and shrink during baking. 4. Chill Out - Chill the crust in the refrigerator or freezer for at least 15 minutes. This allows the butter to harden again, and the crust to stiffen prior to baking. If the crust is not allowed to chill at this stage, it will slump and shrink during baking.
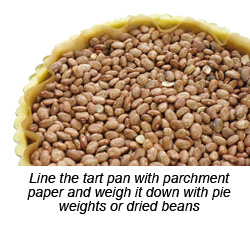
5. Line and Weight - Line the inside of the crust with parchment paper. We find that a neat trimming of this liner allows for even browning of the crust. Place weights inside the liner to keep the crust from ballooning during baking. Pie weights, small aluminum pieces specifically made for this task, may be used over and over again. Dried beans are a doable substitute for pie weights.
6. Bake the Crust - In a hot oven, 400°F, bake the crust for about 10 minutes. During this time, the crust will assume its final shape. Remove the crust from the oven, and carefully remove the liner and pie weights. Return the crust to the oven for another 5 minutes. This second session in the oven will further bake the bottom of the crust to flaky perfection.
7. Sealing the Crust - To extend the "shelf life" of tarts, sealing the crust will help keep it dry and flaky once filled. Sealing may be accomplished in one of several ways depending on your tart.
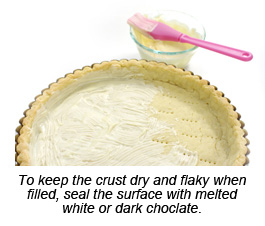 (1) Brush the inside of a hot crust with a beaten egg. Return the crust to the hot oven for 5 additional minutes to cook and set the egg. Take care in applying the egg wash to fill the venting holes in the base of the crust. This type of sealing is perfect for both fillings that are baked or unbaked.
(2) For sweet tarts with a no-bake filling, allow the crust to cool. Melt 1-2 oz. of either white chocolate or dark chocolate, whichever will complement your tart's other flavors and appearance. Brush the melted chocolate in a thin layer on the inside of the crust including the sides, but not the visible rim. Again, check that all the venting holes have been sealed by the chocolate. Chill the crust to harden the chocolate before pouring in the filling. |
|
With a great crust at hand, the last two components of a fantastic tart are the filling and creating an eye-catching top decoration.
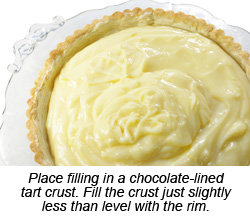 Fillings - We separate tart fillings into two categories - those that require baking, and those that do not. Most baked fillings are based on some variation of an egg custard. Egg custards are simply beaten eggs combined with cream, sour cream, or crème fraîche. The egg mixture easily accepts savory additions of vegetables, meats, and cheeses. Alternatively, add sugar and vanilla to the egg mixture and you have the perfect foil for fruit tarts. Fillings - We separate tart fillings into two categories - those that require baking, and those that do not. Most baked fillings are based on some variation of an egg custard. Egg custards are simply beaten eggs combined with cream, sour cream, or crème fraîche. The egg mixture easily accepts savory additions of vegetables, meats, and cheeses. Alternatively, add sugar and vanilla to the egg mixture and you have the perfect foil for fruit tarts.
We're partial to no-bake fillings during the summer - they're easy to stir together and allow the oven to stay off once the crust is readied. No-bake fillings might include sweetened mascarpone cheese, a lime or lemon curd, (jarred and readily available), or a sweetened sour cream.
Decorate the Top - With the filling, baked or no-bake in place, the "fancy work" begins. Most savory tarts require little decorating other than a simple garnish and the accompaniment of fresh greens. For fruit tarts, the bright colors of summer fruits create instant charm. Follow these steps:
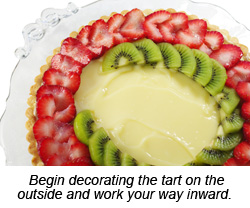 1. Choose appropriate fruits. Summer berries and fruits are great for tarts; avoid fruits that brown quickly, e.g., apples, pears, etc. Also avoid overly juicy fruits such as oranges and other citrus.
2. Wash and pat dry the fruits. Allow them to air dry a bit before slicing. Excess moisture challenges the glazing step that follows.
3. Pick fruits that are similarly sized, or slice them to similar sizes. This may mean that "the ends" or odd ones have to be eaten by the cook on the spot.
4. Arrange the fruits in a round tart pan by starting at the outside and working your way inward to the center.
 The Ultimate Finishing Secret - The secret to gorgeous fresh fruit tarts is the glaze that enrobes the final fresh fruit layer. The simplest glaze is melted jelly or preserves. Gently heat 1 cup of preserves. Just as it melts, thin slightly with a tablespoon or two of water. Strain to remove any fruit pieces or seeds. Brush and dab the melted preserves on top of the fresh fruit taking care to also cover any spaces between fruits. Chill for at least 20 minutes to set the glaze. The Ultimate Finishing Secret - The secret to gorgeous fresh fruit tarts is the glaze that enrobes the final fresh fruit layer. The simplest glaze is melted jelly or preserves. Gently heat 1 cup of preserves. Just as it melts, thin slightly with a tablespoon or two of water. Strain to remove any fruit pieces or seeds. Brush and dab the melted preserves on top of the fresh fruit taking care to also cover any spaces between fruits. Chill for at least 20 minutes to set the glaze.
Apricot preserves are often our glaze of choice because of its slightly tart taste, (no pun intended), and because its subtle coloring allows the fruits' natural coloring to predominant. Red currant jelly is another favorite that we like to pair with red fruits. |
| SMART TART MAKING TIPS |
Tip #1: Prepared fillo dough furnishes another great container for tarts. For an 8-10 inch tart, use 10-12 layers of fillo with clarified butter dabbed between each layer. For small tartlets, 5-6 layers work well. 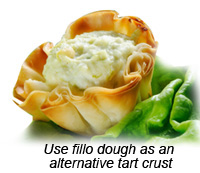 Use a very sharp knife or scissors to trim the fillo to the pan. Tease the edges loose if they crimp together during cutting. If you opt for frozen, pre-baked fillo shells, freshen them with a swipe of clarified butter and a short stint in the oven before filling. Use a very sharp knife or scissors to trim the fillo to the pan. Tease the edges loose if they crimp together during cutting. If you opt for frozen, pre-baked fillo shells, freshen them with a swipe of clarified butter and a short stint in the oven before filling.
Tip #2: Prepared puff pastry in the freezer is a ready crust for all styles of tarts and tartlets. Roll the dough out to 1/8-inch thickness. Brush the edges with an egg wash for the best golden crust effect.
Tip #3: The sugar content of the crust will affect how quickly a crust browns. For a rich, sweetened crust, you may opt to use a pie ring shield to slow down the browning of the crust's edges.
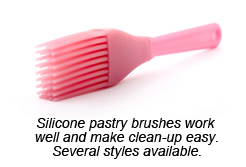 Tip #4: Keep at least two pastry brushes in your gadget drawer - one for savory uses such as garlic butter, BBQ sauce, etc., and the other for sweet things, like painting chocolate on tart crusts or applying jelly glazes. (No garlic overtones allowed on a fresh fruit tart!). Tip #4: Keep at least two pastry brushes in your gadget drawer - one for savory uses such as garlic butter, BBQ sauce, etc., and the other for sweet things, like painting chocolate on tart crusts or applying jelly glazes. (No garlic overtones allowed on a fresh fruit tart!).
Tip #5: Make your tart in stages - the crust may be baked ahead of time, the filling mixed and refrigerated, and most fruits washed and waiting. Do the final assembly near serving time. Tarts are best when freshly assembled, AND eaten completely when served!
Tip #6: Include kids when making tarts, especially at the decorating stage. The "ohhs" and "ahhhs" will be great positive reinforcement for their fledgling cooking skills. |
| Q & A's |
Q: What is treacle tart?
A: Treacle tarts are said to be Harry Potter's favorite food. A treacle tart is made with treacle, a type of syrup, along with lemon butter and breadcrumbs in a basic shortcrust. 
Q: What is Tarte Tatin?
A: A Tarte Tatin is an upside-down apple tart. This now classic dessert started out as kitchen disaster at a French hotel run by Stephanie and Caroline Tatin. Apples coated in a sugar and butter mixture are placed in the bottom of a pan and topped with a pastry crust. The tart is inverted when served so that the apples land on top.
Q: What's the difference between a pie and a tart?
A: Both pies and tarts have pastry crusts and sport any number of fillings. Generally, a tart has a single crust, an open top, and is thinner in nature than a pie.
Q: Why is a teaspoon of vinegar or lemon juice sometimes included in crust recipes?
A: It's said that the acidic quality of vinegar or lemon juice inhibits the formation of long gluten strands that form when the flour comes in contact with moisture. The result is a flakier, tender crust. |
| COOKBOOK REVIEW |
Tarts, Sweet and Savory by Maxine Clark. Photography by Martin Brigdale. Published by Ryland, Peters & Small. New York, NY. Copyright 2007.
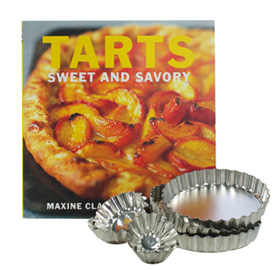 In the words of the first chapter's title, "Home is where the tart is," this charming book offers the reader everything they might want to know about tart-making at home. Starting at the beginning, all types of crusts are discussed ranging from basic shortcrust, to pâte brisée, and pâte sucrée. We especially appreciated her presentation of puff pastry and the "Cheat's Rough Puff Pastry Dough" recipe. With the crust foundation firmly in place, savory tarts are featured as whole pies, individual tarts, and petite tartlets with a wide range of flavorful ingredients - Roquefort Tart, Potato and Parmesan Tart, Portobello Mushroom and Tarragon Tart, and more. Sweet tarts follow with fresh fruit playing starring roles - Classic Lemon Tart, Strawberry Vanilla Tart, Free-form Caramelized Peach Tart, Apricot Tart, and many more. The luscious photographs complete a beautifully assembled cookbook - a perfect gift to pair with a tart pan. In the words of the first chapter's title, "Home is where the tart is," this charming book offers the reader everything they might want to know about tart-making at home. Starting at the beginning, all types of crusts are discussed ranging from basic shortcrust, to pâte brisée, and pâte sucrée. We especially appreciated her presentation of puff pastry and the "Cheat's Rough Puff Pastry Dough" recipe. With the crust foundation firmly in place, savory tarts are featured as whole pies, individual tarts, and petite tartlets with a wide range of flavorful ingredients - Roquefort Tart, Potato and Parmesan Tart, Portobello Mushroom and Tarragon Tart, and more. Sweet tarts follow with fresh fruit playing starring roles - Classic Lemon Tart, Strawberry Vanilla Tart, Free-form Caramelized Peach Tart, Apricot Tart, and many more. The luscious photographs complete a beautifully assembled cookbook - a perfect gift to pair with a tart pan.
|
| |
|