Rolled Sugar Cookies
Click here for a printable version of the recipe.
Yield:
2-1/2-inch cookies: about 30; 3-1/2-inch cookies: about 16; 4-1/2-inch cookies: about 12
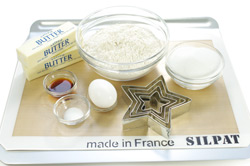
Ingredients:
3 cups all-purpose flour
1/2 teaspoon salt
1 cup (2 sticks) unsalted butter, softened
1 cup sugar
1 large egg
2 teaspoons vanilla* or 1 teaspoon vanilla plus zest of 1 lemon
Food coloring (if your cookie design calls for it)
*Instead of vanilla, you can use other extracts such as almond or peppermint, which we like for candy-cane shapes. If you’re going to be decorating with royal icing, make sure the cookie and icing flavorings are complementary.
1. Whisk together the flour and salt in a medium bowl.
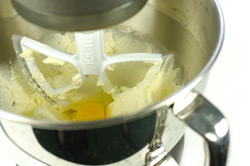
2. Cream together the butter and sugar with your mixer until light and fluffy. Add the egg, vanilla, and lemon zest (if you’re using it) and mix until well blended.
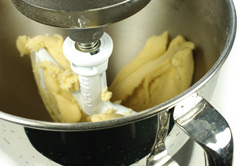
3. With the mixer on low, gradually add the flour mixture to the butter mixture until the two are thoroughly blended. If your design calls for adding food coloring, do so now, and blend well.
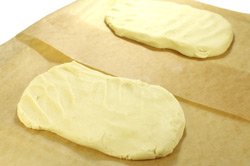
4. Turn the dough onto a work surface and divide into two or three equal portions. Form each one into a rough disk. Now you’re ready to roll, chill, and cut out cookie shapes. (See detailed general rolling and cutting instructions below).
5. Preheat the oven to 350°F.
6. After you’ve rolled and cut the dough and the cookie shapes are on parchment-lined cookie sheets, bake them in the middle rack of your oven for 12 to 16 minutes or until the cookies start to turn golden around the edges,
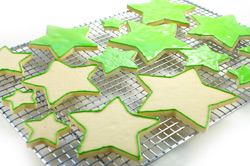
7. Cool the cookies completely before icing or decorating.
For the Star of the Table:
Use 5 graduated sizes of stars, cut four of each size. Frost, decorate and stack.
General Instructions: Rolling and Cutting the Dough
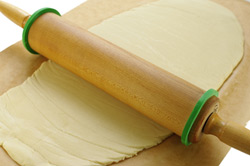
1. Place a piece of waxed paper about the size of your cookie sheet on your rolling surface.
2. Place cookie slats on the edges of the paper. The slats should be a rolling-pin width apart, to ensure that there’s stable contact between the slats and both ends of the rolling pin.
3. Place a disk of cookie dough on top of the waxed paper, between the slats. Place another sheet of waxed paper over the cookie dough and slats and use your hand or rolling pin to slightly flatten and evenly distribute the dough across the paper. Roll the pin over the waxed paper-covered dough, making sure the ends of the pin stay on the slats as the dough flattens (the pin will hover above the slats at first). If the top paper wrinkles, lift and smooth it. You’re finished rolling when the dough surface is uniform and completely level with the cookie slats. You’ll recognize this point: rolling the pin over the dough will feel effortless.
4. Slide the rolled-out piece of dough (paper and all) onto a cookie sheet and refrigerate until it’s firm, 20 to 30 minutes. Repeat the rolling process with the remaining dough portions.
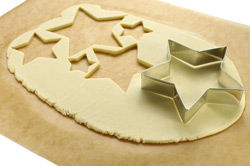
5. When the dough is firm and stiff, transfer it from the refrigerator to your flat work surface. Work with one piece of dough at a time, leaving the others to chill in the refrigerator until you’re ready to cut them. Peel back the top waxed paper from the dough and cut your desired shapes. Try to get as many cookies as possible out of each rolled-out piece of dough.
6. Remove excess dough from around the shapes. Transfer the cookies to a parchment-lined cookie sheet.
7. When you’ve cut as many cookies as possible from all your rolled dough, gather the dough scraps into a ball and roll it again, using the same waxed-paper method. Continue to cut cookies and reroll the dough until you’ve used all the dough, chilling the rolled-out dough whenever it becomes too sticky to work with.
8. If you’re using any of the prebaking decorating methods (imprinting, sugaring, add-ons, and so on), now’s the time to get decorating.
9. Bake and cool the cookies as directed in the recipe (above). |