Lemon Debutante Cake
Makes one 6-inch layer cake
Click here for a printable version of the recipe.
If it could be said that any of our cakes went to finishing school, it would be this one. With a perfectly smooth gown of frosting and delicate piping, this cake is our most turned out; thus we call it the Debutante. It has three layers of sponge cake infused with tart lemon syrup, filled with lemon curd, frosted with light lemony buttercream and is finished with scalloped piping and a sugar flower. The Lemon Debutante Cake takes the Hot Milk Cake in a direction that fully maximizes its capability. The cake absorbs the syrup and holds up the curds and cream without becoming overwhelmed. Here is a textbook example of how to build a layer cake; think of it as a kind of cake compulsory, akin to skating in perfect circles. The decorating techniques for this cake are exactly the same as those you need to make a wedding cake.
This recipe calls for both a Lemon Buttercream made with Lemon Curd and for additional Lemon Curd, so plan to make the Lemon Curd first and give it ample time to chill before making the Lemon Buttercream.
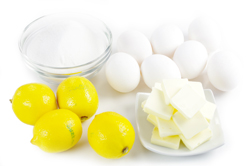
Ingredients
1 Hot Milk Cake (below)
1/4 cup Lemon Simple Syrup (below)
About 4 tablespoons Lemon Curd (below)
About 3 cups Lemon Buttercream (below)
1 small candied sugar flower (optional)
Preparation
1. Make the Hot Milk Cake as directed and make sure it is cool inside and out. (If frozen, let thaw in the refrigerator, 3 to 4 hours. If time demands, you can thaw on the countertop, 1 to 2 hours, but be careful not to let it sit for too much longer before you begin working with it, as a cold cake is easier to cut).
2. Clear a space in the refrigerator large enough for the cake on a cake board. If making the simple syrup, let cool to room temperature. If you made the buttercream previously, remix the frosting until spreadable.
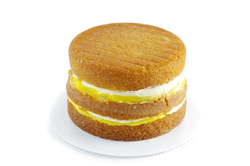
3. Set a revolving cake stand on a clean, dry work surface and place the cake, top-side up, on the stand. Using a serrated knife and holding the blade perfectly horizontal, remove any dome from the top of the cake to level it. While you saw gently with the knife, use your other hand to rotate the stand gradually and bring the cake toward you. Get eye level with the cake as needed to make sure you are holding the knife exactly level. Repeat to split the cake into three equal layers.
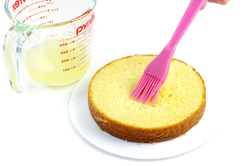
4. Arrange all three cake layers on the work surface. Using your hands, tap off and brush away excess crumbs. Reserve the original bottom layer (flat-dark-side, or pan-side up) to be the top layer of the assembled cake. Tap any crumbs off the cake stand as well, and brush the work surface clean. Using a pastry brush, brush the top of each layer with an ample amount of the lemon syrup.
5. Place a nonslip pad or damp paper towel on the cake stand to prevent slipping and center a cake board on top. Take up the original top of the cake, which you leveled, to be the bottom layer of the assembled cake. Center the first layer of cake with its flattest side facing up on the board.
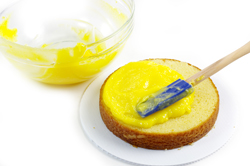
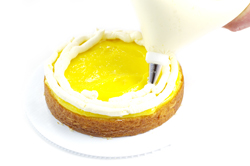
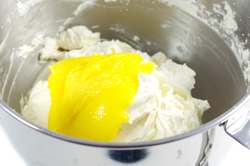
6. Fit a pastry bag with a medium (1/2- or 5/8-inch round top and fill halfway with the buttercream. Pull up the cuff and twist it to seal and tighten the frosting down into the cone. Purge the bag of air bubbles by squeezing the bag until there is a burst of air and frosting sputters out of the bag. Keep the bag tightly twisted so that the frosting doesn't come back up on your hands. Holding the bag upright at a 90-degree angle, pipe a ring of buttercream about 1/2 inch in diameter around the outer edge of the cake to create a barrier. Spoon about 2 tablespoons of curd onto the center of the cake and, using an offset spatula, spread it smoothly all over the top of the cake, out to the edges of the frosting barrier. Take up the filled pastry bag again and, starting at the inside edge of the barrier and working inward, pipe a tight spiral of buttercream over the curd. Gently smooth the buttercream with the offset spatula. You now have a frosted layer laced and dotted with the pockets of lemon curd.
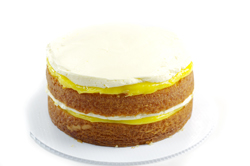
7. Arrange the second cake layer on top and press down lightly to seal and secure. Repeat to frost with the buttercream and curd as above. Place the reserved top piece, flat-side (crust-side) up, on top. You are now ready to apply the crumb coat.
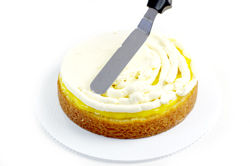
8. Using the offset spatula, apply a scoop of frosting on one side of the cake. Holding the spatula vertically more or less in front of you, rotate the cake stand in one direction to spread the frosting evenly around the sides, about 1/8 inch thick. As you work your way around the circumference of the cake, add more frosting as needed to achieve a thin, even primer coat, but do not backtrack or you may pull crumbs back on top of the frosting instead of enveloping them within. The crumb coat doesn't need to look finished; just make sure the sides are straight. Nudge the layers into position if needed. As you frost the sides, push the frosting up over the top edge of the cake to make sure the coverage is complete, then use this excess to crumb-coat the top, using the spatula to pull the frosting across the cake toward the center. There should be enough extra frosting from the sides to cover the top, but if necessary, add another small scoop and spread smooth to coat.
9. Place the cake, on the cake board, in the refrigerator until the crumb coat has hardened and the layers are firmly attached, 30 minutes to 1 hour. Cover and refrigerate the remaining buttercream (you should have about 1-1/2 cups).
10. When you are ready to finish frosting, remix the remaining buttercream: Place in a microwave-safe bowl and microwave on high for 30-second intervals, stirring in between each, until the frosting is soft, smooth, and spreadable, without any lumps, 15 seconds to 1 minute. If you don't have a microwave, you can also reheat the frosting in a heatproof bowl or the top pan of a double boiler. Place the bowl over (but not touching) gently simmering water in a saucepan or the bottom pan of a double boiler. Stir often, puling the frosting in from the sides of the bowl as it melts, until soft and smooth throughout, 1 to 2 minutes.
11. Transfer the frosting to a clean bowl of a stand mixer and fit the mixer with the paddle attachment. Beat at low speed just until the frosting is smooth and very shiny, 1 to 2 minutes. Do not use a whisk and do not beat at too high a speed or for too long – any of these will add too much air and produce bubbles that will make the presentation layer look porous and pockmarked.
12. When the crumb coat is set, transfer the cake on its board from the refrigerator back onto the revolving cake stand, with the nonslip pad or a damp paper towel underneath. Add the presentation layer of buttercream. Using the offset spatula, apply a scoop of the remixed frosting on one side of the cake and, again keeping the spatula in front of you, rotate the cake stand to spread the frosting in a smooth coat, 1/4 to 1/2 inch thick. Continue to add frosting to the sides of the cake, smoothing with the spatula as you make your way around it.
13. For extra-smooth sides, using a 4-inch spackle blade, go around the frosted sides of the cake again, holding the edge of the blade perfectly straight up and down. Let the rotation of the stand do the work.
14. To finish the top, pull the excess frosting up an over the edges and across the top toward the center, as you did with the crumb coat working evenly around the cake. Finally, still using the offset spatula, add a small scoop of buttercream to the center of the cake and, holding the spatula flat in the center of the cake, rotate the cake stand clockwise, moving the spatula to the edges in gradually widening circles while applying gentle pressure to make a smooth, even coat. Since you are going to add piping around the perimeter, you don't need to worry about the seam at the rim being pristine. Return the cake to the refrigerator and let set until firm, about 30 minutes.
15. To decorate the cake, pipe a small shell border; Fit a pastry bag with a small (1/4- or 3/8-inch) star tip and fill halfway with the remaining buttercream. Pointing the tip at the top rim of the cake at a 45-degree angle, apply a small burst of pressure to create a tiny hump and release, moving up just a tad to make a shell shape; repeat this motion around the perimeter to create the shell border. Refill the bag; holding it at a 45-degree angle at the base of the cake, use the same motion to pipe the bottom border. Place the candied sugar flower in the center of the cake. Very carefully transfer the cake on the board to a presentation platter or plate.
16. This cake needs to be served at room temperature. Serve at once, or hold at room temperature for up to 4 hours. For longer storage, refrigerate for up to 2 days and remove from the refrigerator 4 hours before serving.
Hot Milk Cake
Makes two 6-inch cakes
[Note: Only one cake is required for the Lemon Debutante Cake; make two and freeze the second one, or bake as one 9-inch cake, or bake as individual cakes in ramekins or as cupcakes].
Hot Milk Cake is a wonderfully delicate and moist cake that we use in place of a traditional "white" cake. This recipe yields two beautiful 6-inch cakes for building on and decorating, and is the foundation for the Lemon Debutante Cake, the Princess Cake, the Coconut Mousse Cake, and the Strawberry Charlotte.
I originally found the comfortingly named "hot milk cake" in a collection of old New England recipes and have been using it ever since. Milk and butter give it a tender crumb with a sturdy texture and; unlike many traditional white cakes, which often can be dry, this hot milk cake is moist and flavorful. Hot milk cake is technically a sponge cake made with the addition of baking powder and a large amount of butter. The texture is stronger than most sponges – it stands up beautifully to buttercream – but still light and airy enough to absorb a syrup, without becoming gummy or grainy. That means you can flavor it in many different directions or serve it on its own with berries and whipped cream. Hot milk cake is often used as the base for wedding cakes.
This is a challenging cake, in that there are a couple of steps you need to manage simultaneously. The key to success lies completely in temperature control, so it is crucial that you have an instant-read thermometer at the ready. Two separate mixtures that started hot are combined only when they have cooled to the same room temperature. Using a thermometer will help ensure the proper emulsification of the subtly special batter.
Ingredients
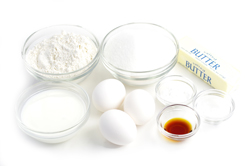
1-1/2 cups (6.5 ounces) all-purpose flour
2 teaspoons baking powder
1/4 teaspoon kosher salt
1/2 cup (4 ounces) unsalted butter, at room temperature
1/2 cup whole milk
1-1/2 cups (10.5) ounces sugar
3 large eggs
1/2 teaspoon vanilla extract
Preparation
1. Liberally butter two 6-by 3-inch cake pans and dust with flour. Tap out the excess flour.
2. Preheat the oven to 350 degrees F.
3. Sift together the flour, baking powder, and salt into a bowl and set aside.
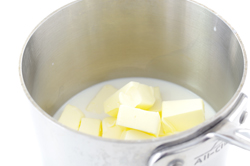
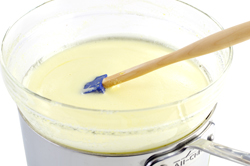
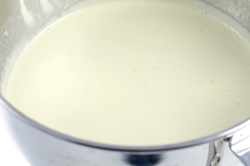
4. In a saucepan over medium-low heat, combine the butter and milk and heat, stirring occasionally, until the butter is melted, 3 to 4 minutes. (Alternatively, in a microwave-safe bowl, combine the butter and milk and microwave on high at 10-second intervals, stirring between each, until the butter is melted). Pour the milk mixture into a large bowl. Set aside and let cool to slightly above room temperature; an instant-read thermometer should register between 80 and 85 degrees F. You want the milk and butter to remain incorporated, so whisk the mixture occasionally and vigorously while it is cooling and up until you add it to the batter.
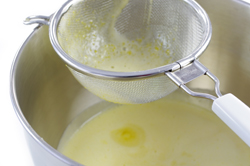
5. In the top pan of a double boiler or in a bowl for a bain-marie, whisk together the sugar, eggs, and vanilla. Fit the top pan or bowl over (but not touching) simmering water in the bottom pan or a saucepan and gently warm the mixture, stirring just until the sugar is dissolved and the thermometer registers 110 degrees F, about 10 minutes. Pour the egg mixture through a medium-mesh sieve into the bowl of a stand mixer. Fit the mixer with the whisk attachment and whisk on high speed until the mixture is light and fluffy and has cooled to slightly above room temperature (between 80- to 85 degrees F), about 10 minutes. (Note: The batter becomes more stable as the mixture cools; this is an important factor in creating a cake with good structure).
6. Stop the mixer. Add the sifted dry ingredients and mix on low until just incorporated. The batter should be smooth. Check the milk mixture to make sure it is fully cooled, then slowly pour it into the batter, whisking on low speed. Stop mixing as soon as the batter is well blended and smooth. Remove the bowl from the mixer, scrape down the sides of the bowl again, and fold by hand a few times with the spatula. Divide the batter between the prepared pans. Bake until the cakes are golden brown and a tester inserted in the center comes out clean, 30 to 35 minutes.
7. Transfer to wire racks and let cool in the pans for about 20 minutes. When the cakes are cooled enough to handle the pans but still a tad warm to the touch, carefully run an offset spatula around the edges of the pans to loosen them, then invert the cakes onto the racks and remove the pans. Let cool for about 30 minutes longer. Wrap the cakes tightly in plastic wrap and refrigerate to ensure that the interiors are completely cooled before decorating, at least 1 hour or for up to 3 days. To freeze, wrap tightly in a second layer of plastic wrap and store in the freezer for up to 2 months.
Lemon Simple Syrup
Makes 3/4 cup
[Note: Only 1/4 cup of syrup is required for one 6-inch Lemon Debutante Cake].
We use our simple syrups to infuse our cakes with flavor and add a subtle background note to our Lemon Debutante Cake, Princess Cake, Bumblebee Cake, and Lemon Tea Cake. You only need a few tablespoons per cake, but since simple syrups can be stored for up to a month, it's convenient to make a cup or two and use as needed.
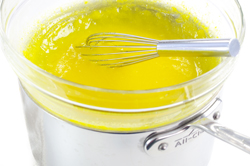
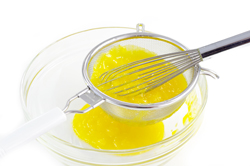
In a small saucepan, combine 1/2 cup water, 1/4 cup fresh lemon juice, and 1/4 cup sugar and bring to a boil over medium-high heat, stirring to dissolve the sugar. Let cool and store tightly sealed in the refrigerator for up to 1 month. |