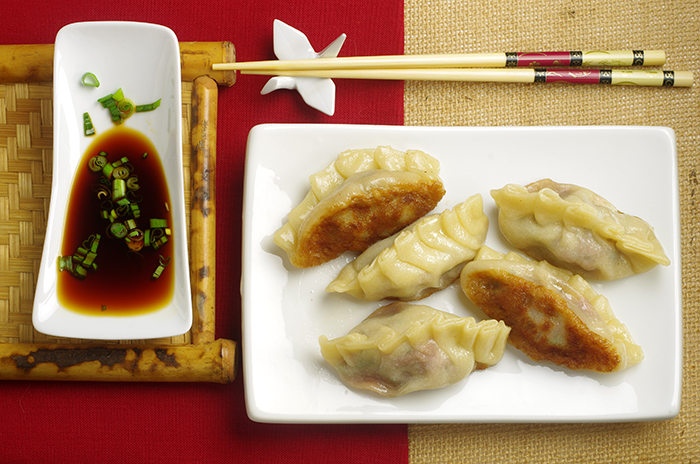
Meat and Chinese Chive Pot Stickers
Guotie
Makes 32 dumplings, serving 4 as a main course,
6 to 8 as a snack or starter
Click here for a printable version of the recipe.
I first tasted pot stickers in the late 1980s at the tiny Mandarin Deli in Los Angeles’s Chinatown. Behind the glass window, a dumpling maker steadily worked, rolling out thin wrappers, filling them, and creating large pea pod-shaped dumplings. I watched intently, distracted only when my fragrant pot stickers arrived. The hearty dumplings were so hot that I burned my mouth, but they were well worth the minor injury.
Pot stickers supposedly started out as boiled dumplings that a chef forgot about in the wok (guo) and they stuck (tie) after the water had cooked away. His guests loved the contrasts between succulent filling, tender-chewy skin, and crusty bottom, and thus the pot sticker was born. The modern way to mimic the chef’s delicious accident is to cook pot stickers in a skillet with water and oil, which steams the dumplings and fries their bottoms to a golden, toasty finish. They are technically called jianjiao in Chinese, which means shallow-fried dumplings; but in the West, we commonly know them as pot stickers and panfried dumplings. “Fried” dumplings can be panfried or deep-fried.
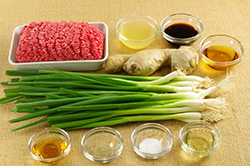
FILLING
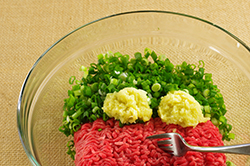
2/3 pound ground beef (preferably chuck) or lamb, coarsely chopped to loosen
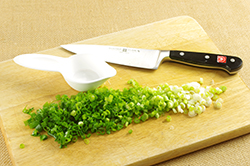
2/3 cup chopped Chinese chives or scallions (white and green parts)
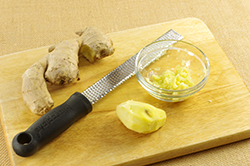
1-1/2 to 2 tablespoons finely minced fresh ginger (use 2 tablespoons for lamb)
1/2 teaspoon salt
1/8 teaspoon ground white pepper
1/3 cup Chicken Stock (page 222) or water
2 tablespoons light (regular) soy sauce
1 tablespoon Shaoxing rice wine or dry sherry
1-1/2 tablespoons canola oil
1-1/2 tablespoons sesame oil
1 pound Basic Dumpling Dough (page 22)
Canola or peanut oil, for panfrying
2/3 cup Tangy Soy Dipping Sauce (page 215)
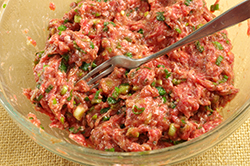
1. To make the filling, combine the beef, Chinese chives, and ginger in a bowl. Use a fork or spatula to stir and lightly mash the ingredients so that they start commingling.
2. In a small bowl, stir together the salt, white pepper, chicken stock, soy sauce, rice wine, canola oil, and sesame oil. Pour these seasonings over the beef mixture, then stir and fold the ingredients together. Once you have broken up the large chunks of beef, briskly stir to blend the ingredients into a cohesive, thick mixture. To develop the flavors, cover with plastic wrap and set aside at room temperature for 30 minutes. You should have about 2 cups of filling. (The filling can be prepared 1 day ahead and refrigerated. Bring it to room temperature before assembling the dumplings.)
3. Meanwhile, form 16 wrappers from half of the dough. Aim for wrappers that are about 3-1/4 inches in diameter.
4. Before assembling the dumplings, line a baking sheet with parchment paper. (If you plan to refrigerate the dumplings for several hours or freeze them, lightly dust the paper with flour to avoid sticking.)
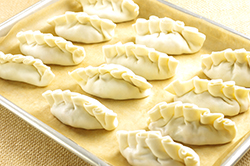
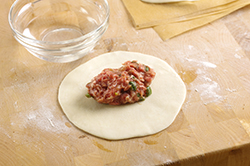
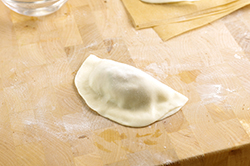
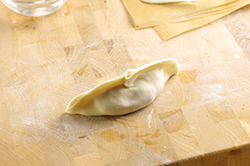
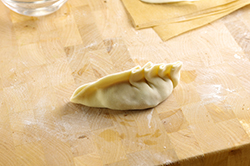
5. For each dumpling, hold a wrapper in a slightly cupped hand. Scoop up about 1 tablespoon of filling with a bamboo dumpling spatula, dinner knife, or fork and position it slightly off-center toward the upper half of the wrapper, pressing and shaping it into a flat mound and keeping about 1/2 to 3/4-inch of a wrapper clear on all sides. Fold, pleat, and press to enclose the filling and create half-moon, pea pod, or pleated crescent shapes.
Place the finished dumpling on the prepared baking sheet. Repeat with the other wrappers, assembling the dumplings and spacing them a good 1/2-inch apart on the baking sheet. Keeping the finished dumplings covered with a dry kitchen towel, form and fill the wrappers from the remaining dough.
6. Once all the dumplings are assembled are assembled, they can be covered with plastic wrap and refrigerated for several hours; they can be cooked straight from the refrigerator. For longer storage, freeze them on their baking sheet until hard (about 1 hour), transfer them to a zip-top freezer bag, pressing out excess air before sealing, and keep them frozen for up to 1 month; partially thaw, using your finger to smooth over any cracks that may have formed during freezing, before cooking.
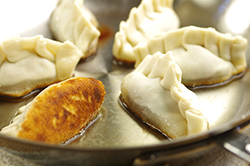
7. To panfry the dumplings, use a medium or large nonstick skillet; if both sizes are handy, cook two batches at the same time. Heat the skillet over medium-high heat and add 1-1/2 tablespoons oil for a medium skillet and 2 tablespoons for a large one. Place the dumplings 1 at a time, sealed edges up, in a winding circle pattern. The dumplings can touch. (In general, medium skillets will fit 12 to14 dumplings large skillets will fit 16 to 18 dumplings.) Fry the dumplings for 1 to 2 minutes, until they are golden or light brown on the bottom.
8. Holding the lid close to the skillet to lesson the dramatic effect of water hitting hot oil, use a kettle or measuring cup to add water to a depth of roughly 1/4-inch; expect to use about 1/3 cup of water. The water will immediately sputter and boil vigorously. Cover with a lid or aluminum foil, lower the heat to medium, and let the water bubble away for 8 to 10 minutes, until it is mostly gone. After 6 to 8 minutes, move the lid or foil so that it is slightly ajar to allow steam to shoot out from underneath. This lessens the drama of condensation dripping down onto the hot oil when you remove the lid. When you hear sizzling noises (a sign that most of the water is gone), remove the lid. Let the dumplings fry for another 1 to 2 minutes, until the bottoms are brown and crisp.
Turn off the heat and wait until the sizzling stops before using a spatula to transfer the dumplings to a serving plate. Display them with their bottoms facing up so that they remain crisp.
9. Serve with the dipping sauce in a communal bowl for people to help themselves or divided up among individual rice bowls or large dipping sauce dishes. Eat these with chopsticks in one hand and a spoon or rice bowl in the other to catch any drips of dipping sauce or juices that spill out when you bite into the pot sticker.
|
|

|
| |
|
|
Basic Dumpling Dough
Makes about 1 pound, enough for 32 medium or 24 large dumplings
This dough is the foundation of many excellent dumplings, including Chinese jiaozi, Korean mandu, and Nepali momo. The process of making the dough is easy to master, especially with a little help from modern tools such as a food processor (though you can mix the dough by hand).
Asian wheat flour wrappers may be made with cold or hot water -- the temperature is traditionally dictated by the cooking method. Boiled dumplings are said to require thicker skins made from cold-water dough in order to withstand the pressures of boiling, whereas panfried and steamed dumplings require thinner skins made from hot-water dough for their gentler cooking processes. Over the years, I’ve found that homemade wrappers of medium thickness, a scant 1/8 inch thick in the center and about 1/16 inch thick at the rim, work well for all cooking methods. If dumplings are gently boiled as described for shuijiao, there is no need for thicker wrappers. Producing medium-thick wrappers is easier with hot-water dough as it is more yielding than its cold-water counterpart. The resulting wrappers taste superior to store-bought ones, and they need no water to seal. Grocery store all-purpose flour with a moderate amount of gluten, such as Gold Medal brand, works exceptionally well.
10 ounces (2 cups) unbleached all-purpose flour
About 3/4 cup just-boiled water
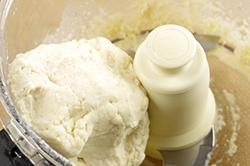
1. To prepare the dough in a food processor, put the flour in the work bowl. With the machine running, add 3/4 cup of water in a steady stream through the feed tube. As soon as all the water has been added, stop the machine and check the dough. It should look rough and feel soft but firm enough to hold its shape when pinched. If necessary, add water by the teaspoon or flour by the tablespoon. When satisfied, run the machine for another 5 to 10 seconds to further knead and form a ball around the blade. Avoid overworking the dough.
2. Alternatively, make the dough by hand. Put a bowl atop a kitchen towel to prevent it from slipping while you work. Put the flour in the bowl and make a well in the center. Use a wooden spoon or bamboo rice paddle to stir the flour while you add 3/4 cup water in a steady stream. Aim to evenly moisten the flour. It is okay to pause to stir or add water -- it is hard to simultaneously do both actions. When all the water has been added, you will have lots of lumpy bits. Knead the dough in the bowl (it is not terribly hot) to bring all the lumps into one mass; if the dough does not come together easily, add water by the teaspoon.
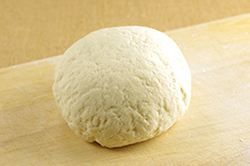
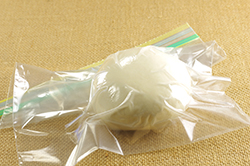
3. Regardless of the mixing method, transfer the dough and any bits to a work surface; flour your work surface only if necessary, and then sparingly. Knead the dough (it is not hot) with the heel of your hand for about 30 seconds for machine-made dough, or about 2 minutes for handmade dough. The result should be nearly smooth and somewhat elastic: press on the dough; it should slowly bounce back, with a light impression of your finger remaining. Place the dough in a zip-top plastic bag and seal tightly closed, expelling excess air. Set aside to rest at room temperature for at least 15 minutes and up to 2 hours. The dough will steam up the plastic bag and become earlobe soft, which makes wrappers easy to work with.
4. After resting, the dough can be used right away to form the wrappers. Or, refrigerate it overnight and return it to room temperature before using. 5. Note: Recipes for hot-water dough often call for boiling water to hydrate the dry ingredients, but I find that practice too dangerous and prefer to let the water rest first. For the just-boiled water, half-fill a kettle or saucepan with water and bring it to a boil. Turn off the heat and after the bubbling action subsides, 30 to 90 seconds (depending on the heating vessel), pour the amount needed into a glass measuring cup and use for making the dough. I typically wait no more than 2 minutes after boiling to use the water.
Lazy Day Tip
You can substitute purchased wrappers for homemade ones. Medium-thick pot sticker wrappers are good for boiled, panfried, and steamed dumplings; however, they do not deep-fry well. Sui gow wrappers are typically made relatively thick for boiled dumplings. If your wrappers are soft and fresh but on the thick side, try rolling them to create thinner ones. A commercially made wrapper holds less filling than a homemade one, so your yield will be higher for the filling recipes here. When using store-bought wrappers, moisten the edge with water to seal them. Purchased wheat flour wrappers are best used for shaping half-moons, pea pods, pleated crescents, and big hugs, but not closed satchels.
Forming Wrappers from Basic Dumpling Dough
Wrappers formed from basic dumpling dough are traditionally rolled out individually by hand with a skinny wooden rolling pin. I like to cut down the work by employing a Mexican tortilla press to first quickly flatten the dough into a thin disk and then finishing the job with the skinny rolling pin. You can use some other kind of heavy, flat-bottomed object, such as a 4-cup glass measuring cup, but it will require a little more energy than the press. Regardless, have on hand two 6 to 7-inch squares of medium-heavy plastic (I cut them from a zip-top freezer bag) for the pressing. Make sure to use a spacious work surface (for example, a large cutting board), lightly dusted with flour and with about 1/4 cup of additional flour in one corner for dusting. And regardless of how you initially flatten the dough, you’ll definitely need the small rolling pin to finish the wrappers. Have your filling ready to go before you start rolling, as you’ll want to fill the wrappers fairly promptly after they are rolled.
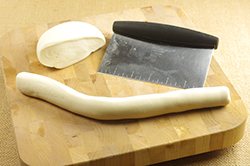
1. Remove the dough from the bag, turning the bag inside out if the dough is sticky. Put the dough on a lightly floured work surface and cut it in half. Put half back in the bag, squeezing out the air and sealing it closed to prevent drying.
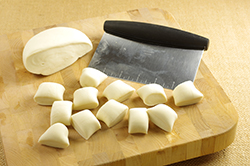
2. Roll the dough into a 1-inch thick log, and then cut it into the number of pieces required by the recipe. To cut even pieces, quarter the log first; the tapered end pieces should be cut a little longer than the rest. Weigh each piece of dough to be super precise, if you like. If your dough pieces are oval shaped, stand each one on a cut end and use your fingers to gently squeeze it into a round. The resulting squat cylinder resembles a scallop. This bit of advance work makes it easier to form a nice circle in the remaining steps.
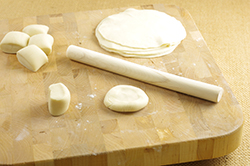
3. To prevent the dough from sticking and to flatten it a bit, take each piece of dough and press one of the cut ends in flour, then flip it over and do the same on the other ends; the dough can be sticky. You should end up with a disk roughly 1/4 inch thick. As you work, set the floured disks to one side of your work area.
4. Next flatten each dough disk into a thin circle that is about 1/8 inch thick, either with a tortilla press or with a heavy, flat-bottomed object. If you are using the tortilla press, open the press and lay a plastic square on the bottom plate. Center a disk of floured dough and cover with the other plastic square. Close the top plate, then fold the pressure handle over the top plate and press down. Use moderate pressure and press only once, or the resulting wrapper will stick to the plastic and be hard to remove.
Fold back the pressure handle, open the top plate, and peel off the top plastic square. Then gently peel the wrapper off the bottom plastic square. Should the wrapper feel tacky, lightly swipe both sides on some flour before placing on the work surface. Without the tortilla press, put the floured disk between the plastic squares and press down with a heavy object to produce a circle about 1/8-inch thick. You may have to press more than once. Gently peel the plastic from the wrapper.
Regardless of method, repeat with the remaining dough pieces, setting them to one side of the work area as you finish them. It is okay to overlap the wrappers slightly.
5. To finish the wrappers, take a wrapper and place it on the work surface, flouring the surface only as needed to keep the dough from sticking. Imagine a quarter-sized circle in the center. This is what the Chinese call the “belly” of the wrapper. You want to create a wrapper that is larger than its current size but retains a thick belly. This ensures an even distribution of dough after the wrapper’s edge has been gathered and closed around the filing.
To keep a thick belly, use the rolling pin to apply pressure on the outer 1/2 to 3/4-inch border of the wrapper, as follows. Try to roll the rolling pin with the flat palm of one hand while using the other hand to turn the wrapper in the opposite direction. For example, as your right palm works the rolling pin in short, downward strokes from the center toward your body, the fingers of your left hand turn the disk counterclockwise about one-quarter of a turn between each stroke. Keep the thumb of the rotating hand near the center if the wrapper to guide the rolling pin and turn the wrapper.
If the wrapper sticks to the work surface or rolling pin, pause to dust the wrapper with flour and then continue. If you cannot get a wrapper thin enough on the first try, set it aside to relax for about 1 minute, and then roll again. Should the wrapper tear or be hopelessly misshapen, roll up the dough, let it rest for a few minutes, them press it again and roll it out. Resembling a flat fried egg, the finished wrapper does not need to be a perfect circle. Frilly edges are fine. The finished diameter of the wrapper depends on the dumpling, and each recipe provides an ideal size. Wrappers made from the Basic Dumpling Dough are moderately thick and suitable for boiled, steamed, panfried, and deep-fried morsels.
As you work, line up the finished wrappers on your work surface; if you need extra space, use a baking sheet lined with parchment paper and dusted with flour. A bit of overlapping is fine, but avoid stacking the wrappers. When a batch of wrappers is formed, fill them before making wrappers out of the other portion of dough, or the wrappers may stick together as they wait for you. Use the instructions in the recipe to fill, shape, and cook the dumplings. |
|

|
| |
|
|
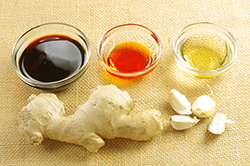
Tangy Soy Dipping Sauce
Tangy Soy Dipping Sauce
Makes about 2/3 cup
Great on their own, Chinese jiaozi get a fantastic flavor boost when dipped in a zippy sauce like this one. The tart-salty-spicy combination adds a complex edge to the dumplings.
There’s no such thing as a definitive dipping sauce, since cooks and diners mix up their own according to personal taste. At the least, your sauce should be tangy and savory. But add some nutty, hot chile oil, and your eating experience will enter a different orbit. Chinese dumplings are wonderful with an extra kick of ginger or garlic in the sauce, too. I prepare the sauce in advance, but you can set out the ingredients and invite guests to do it themselves.
1/3 cup light (regular) soy sauce
2-1/2 tablespoons unseasoned rice, Chinkiang, or balsamic vinegar
1/8 teaspoon sugar (optional)
1 to 3 teaspoons Chile Oil (optional)
1 tablespoon finely shredded fresh ginger, or
2 teaspoons finely minced garlic (optional)
Combine the soy sauce, vinegar, and sugar in a bowl. Stir to dissolve the sugar. Taste and adjust the flavors to your liking for a tart-savory balance. Add as much chile oil as you like for some heat. The sauce can be prepared several hours in advance up to this point. Right before serving, add the ginger or garlic for a fresh layer of punch. |
|
|
|