BPP_Masthead
Santa's Sleigh

Santa’s Sleigh
Makes about 3 small sleighs

 
Who doesn’t like to get gifts from Santa? Our adaptation of Santa’s Sleigh is a petite version of the sleigh included in Cookie Craft. Using the basic cookie sugar dough, a half-sized sleigh was crafted and assembled. The sleigh is perfect for filling with additional treats. A lovely centerpiece or gift!
 
Dough  

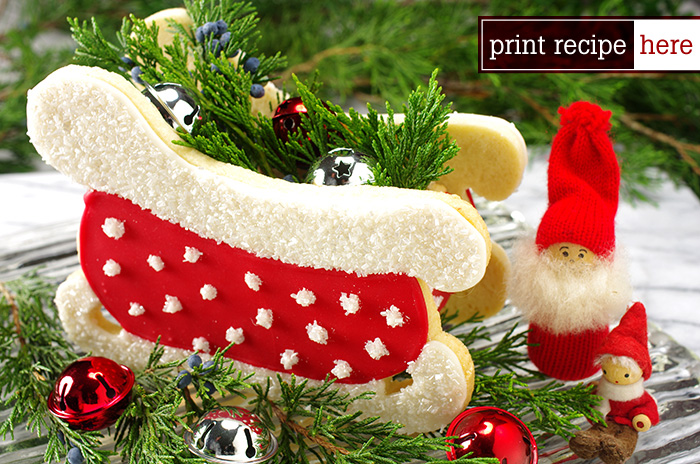
Basic Rolled Sugar Cookie Dough

We especially like to add lemon zest to give these a fresh zing, but they’re tasty with vanilla alone.
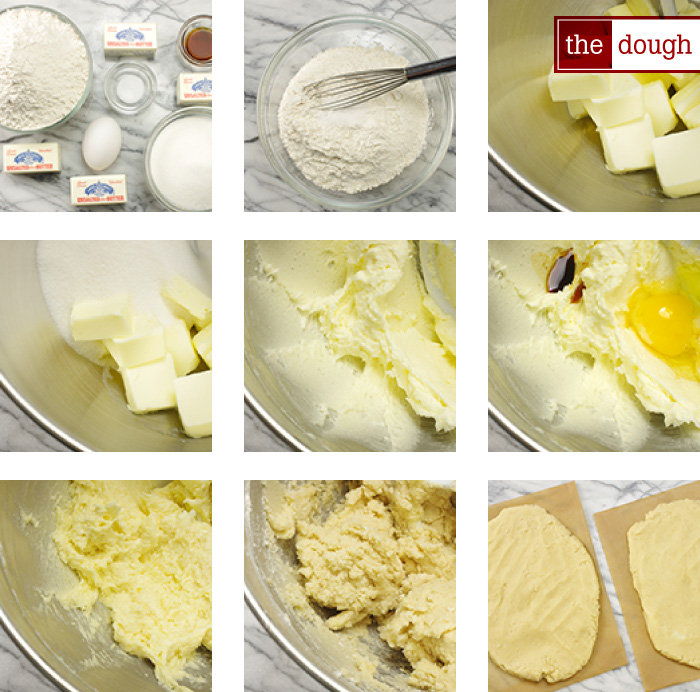
Ingredients:
3 cups all-purpose flour
1/2 teaspoon salt
1 cup (2 sticks) unsalted butter, softened
1 cup sugar
1 large egg
2 teaspoons vanilla*
    or 1 teaspoon vanilla plus zest of 1 lemon

Directions:
1. Whisk together the flour and salt in a medium bowl and set aside.

2. Using your mixer, cream together the butter and sugar until the mixture is light and fluffy. (If your mixer has multiple attachments, use the paddle.) Add the egg and vanilla (and lemon zest if you’re using it) or your extract of choice and mix until well blended.

3. With the mixer on low, gradually add the flour mixture to the butter mixture until the two are thoroughly blended.

4. If your cookie design calls for adding food coloring, do so now, and continue blending until the desired color is reached and is evenly incorporated.

5. Turn out the dough onto the work surface and divide it into two or three equal portions. Form each one into a rough disk. Now you’re ready to roll, chill, and cut out the cookie shapes.

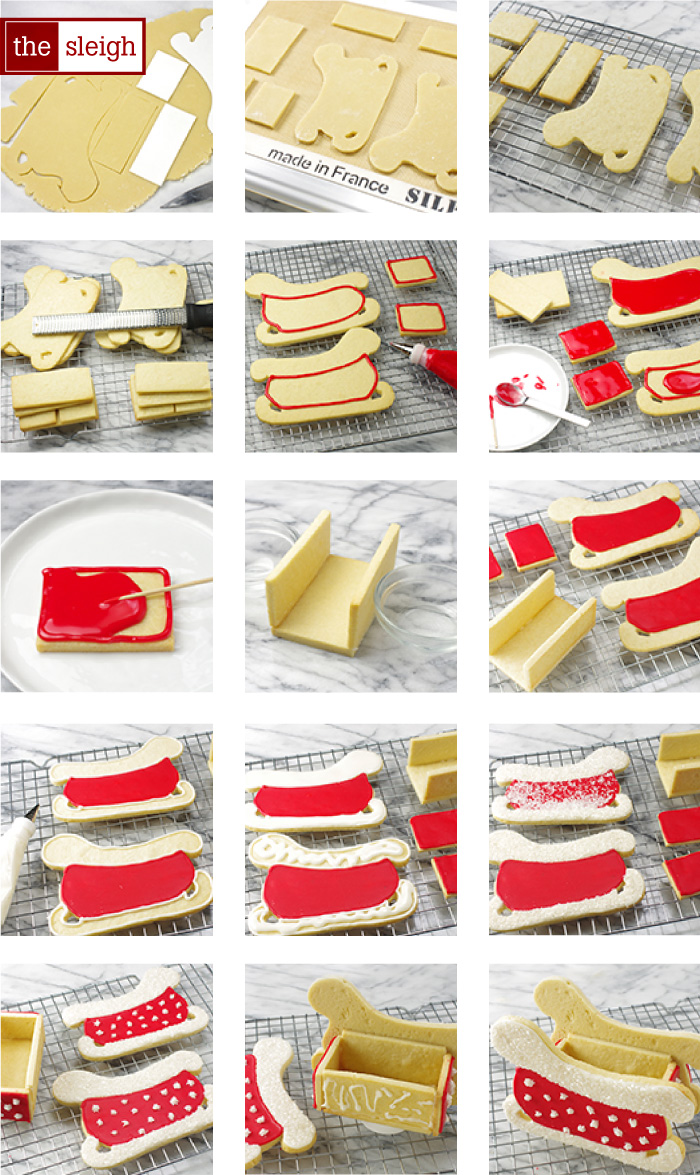
6. Using the templates, print and cut the templates on card stock. Cut out the paper templates and place on the rolled, well-chilled quarter-inch cookie dough. (Chilled cookie dough will cut better with clean edges than room temperature dough.)

7. Cut two sleigh sides, one the mirror image of the other. Cut two box sides, two box ends, and one box bottom. Transfer to a baking sheet.

8. Preheat the oven to 350°F.

9. Bake the pieces in the middle rack of your oven for 12-16 minutes or until the cookies start to turn slightly golden around the edges (smaller cookies will be done more quickly). NOTE: If you decide to bake two sheets of cookies at a time, space your two oven racks evenly in the oven and rotate the cookie sheets halfway through baking (that is, switch the position of the top sheet and bottom sheet and turn both so that the front of each sheet is at the back to promote even baking).

10. Cool the cookies completely on a rack before icing or decorating.

 
Glaze
 

Vanilla Cookie Icing – (our own version of a classic glaze)
This simple icing works well for both piping and flooding on cookies.

Ingredients:
2-1/2 cups confectioners’ sugar
2 tablespoons light corn syrup
1/2 teaspoon pure vanilla extract
1 - 2 tablespoons whole milk
Red food coloring

Directions:
1. Sift the powdered sugar into a mixing bowl to remove any lumps or hard pieces

2. Add the corn syrup, vanilla extract, and 1 tablespoon of the milk. Whisk together by hand to combine. (To minimize air bubbles, mix by hand; avoid using a hand mixer or stand mixer for this step).

3. Add additional milk a teaspoon at a time until the icing is mixed thoroughly, yet quite stiff.

4. Divide the icing into separate bowls in two equal portions. One bowl will be used for the white areas of the sleigh the other will be red for the sleigh sides.

5. For the white icing portions, continue to add drops of milk until the icing is fluid, yet when drizzled on top keeps the imprint.

6. Remove two-thirds of the white icing to another bowl; place the remaining icing into a piping bag outfitted with a #4 tip for outlining the edges of the cookies. Check the consistency of the icing; it should be easy to pipe a line, and the line should spread just slightly, but more or less keep its shape.

7. In the other bowl, continue to add drops of milk to the larger portion of white icing until the consistency is more fluid for flooding. A ribbon of icing on the bowl should take 3-4 seconds to disappear into the surface. Cover tightly until ready to use.

8. With the other reserved portion of icing, add the red food coloring until the desired color is achieved, then continue to piping consistency by continuing to add drops of milk until the icing drizzled on top with the whisk is fluid but keeps the imprint.

9. Remove two-thirds of the red icing to another bowl; place the remaining icing into a piping bag outfitted with a #4 tip for outlining the edges of the cookies. Check the consistency of the icing; it should be easy to pipe a line, and the line should spread just slightly, but more or less keep its shape.

10. Continue to add drops of milk to the larger portion of red icing until the consistency is more fluid for flooding. A ribbon of icing on the bowl should take 3-4 seconds to disappear into the surface. Cover tightly until ready to use.

 
Santa's Sleigh  

Decorating and Embellishing:

Embellishment Ingredients:
White glitter sugar, or white coarse sanding sugar

1. With the red piping icing, outline the sides of the sleigh as pictured. Let dry for about 15 minutes, then flood the area with the red flooding icing.

2. With the red piping icing, outline the ends of the sleigh box as pictured. Let dry for about 15 minutes, then flood the area with the red flooding icing.

3. After an hour or overnight, outline the top of the sleigh and the runners with white piping icing as pictured. Let dry for about 15 minutes, then flood the outlined area with the white flooding icing. While still wet, sprinkle on the white glitter sugar, or coarse, white sanding sugar.

4. With white piping icing, dot the red flooded areas with small dots. While still wet, sprinkle on the white glitter sugar, or coarse, white sanding sugar. Allow to dry, then brush away any excess glitter.

5. With the white piping icing, pipe a line of icing on the bottom of the box sides and set on top of the box bottom piece. Prop in place and allow to dry. Similarly, affix the iced box ends to the sleigh box. Allow to dry thoroughly. Place additional white piping icing on the outside of the box sides and affix the decorated sleigh sides. Allow to dry thoroughly. Fill with treats and display your creation!

 
Cookbook

Acorn Farm | 367 N. Main St. | Milford, MI 48381 | (248) 684-1373 | Copyright 2013 - Acorn Advisors