Cooks'Wares Masthead
Santa Claus Cookies

Santa Claus Cookies
Makes about 12-16 four-inch round cookies

 
Dough  

Basic Rolled Sugar Cookie Dough

We especially like to add lemon zest to give these a fresh zing, but they’re tasty with vanilla alone.

Yield:
2-1/2-inch cookies – about 30
3-1/2-inch cookies – about 16
4-1/2-inch cookies – about 12

Ingredients:
3 cups all-purpose flour
1/2 teaspoon salt
1 cup (2 sticks) unsalted butter, softened
1 cup sugar
1 large egg
2 teaspoons vanilla*
   or 1 teaspoon vanilla plus zest of 1 lemon
food coloring (if your cookie design calls for it)

Directions:
1. Whisk together the flour and salt in a medium bowl and set aside.

2. Using your mixer, cream together the butter and sugar until the mixture is light and fluffy. (If your mixer has multiple attachments, use the paddle.) Add the egg and vanilla (and lemon zest if you’re using it) or your extract of choice and mix until well blended.

3. With the mixer on low, gradually add the flour mixture to the butter mixture until the two are thoroughly blended.

4. If your cookie design calls for adding food coloring, do so now, and continue blending until the desired color is reached and is evenly incorporated

5. Turn out the dough onto the work surface and divide it into two or three equal portions. Form each one into a rough disk. Now you’re ready to roll, chill, and cut out the cookie shapes.

6. Preheat the oven to 350°F.

7. After you’ve rolled and cut the dough and the cookie shapes are on parchment-lined cookie sheets, bake them in the middle rack of your oven for 12-16 minutes or until the cookies start to turn slightly golden around the edges (smaller cookies will be done more quickly). NOTE: If you decide to bake two sheets of cookies at a time, space your two oven racks evenly in the oven and rotate the cookie sheets halfway through baking (that is, switch the position of the top sheet and bottom sheet and turn both so that the front of each sheet is at the back to promote even baking).

8. Cool the cookies completely on a rack before icing or decorating.

Glaze  

Vanilla Cookie Icing – (our own version of a classic glaze)
This simple icing works well for both piping and flooding on cookies.

Ingredients:
2-1/2 cups confectioners’ sugar
2 tablespoons light corn syrup
1/2 teaspoon pure vanilla extract
1 - 2 tablespoons whole milk
Red food coloring

Directions:
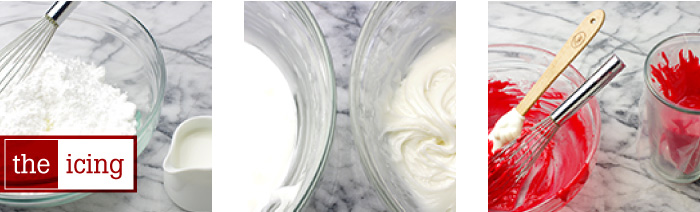
1. Sift the powdered sugar into a mixing bowl to remove any lumps or hard pieces

2. Add the corn syrup, vanilla extract, and 1 tablespoon of the milk. Whisk together by hand to combine. (To minimize air bubbles, mix by hand; avoid using a hand mixer or stand mixer for this step).

3. Add additional milk a teaspoon at a time until the icing is mixed thoroughly, yet quite stiff.

4. Divide the icing into separate bowls in two equal portions. One bowl will be used for the white areas of the sleigh the other will be red for the sleigh sides.

5. For the white icing portions, continue to add drops of milk until the icing is fluid, yet when drizzled on top keeps the imprint.

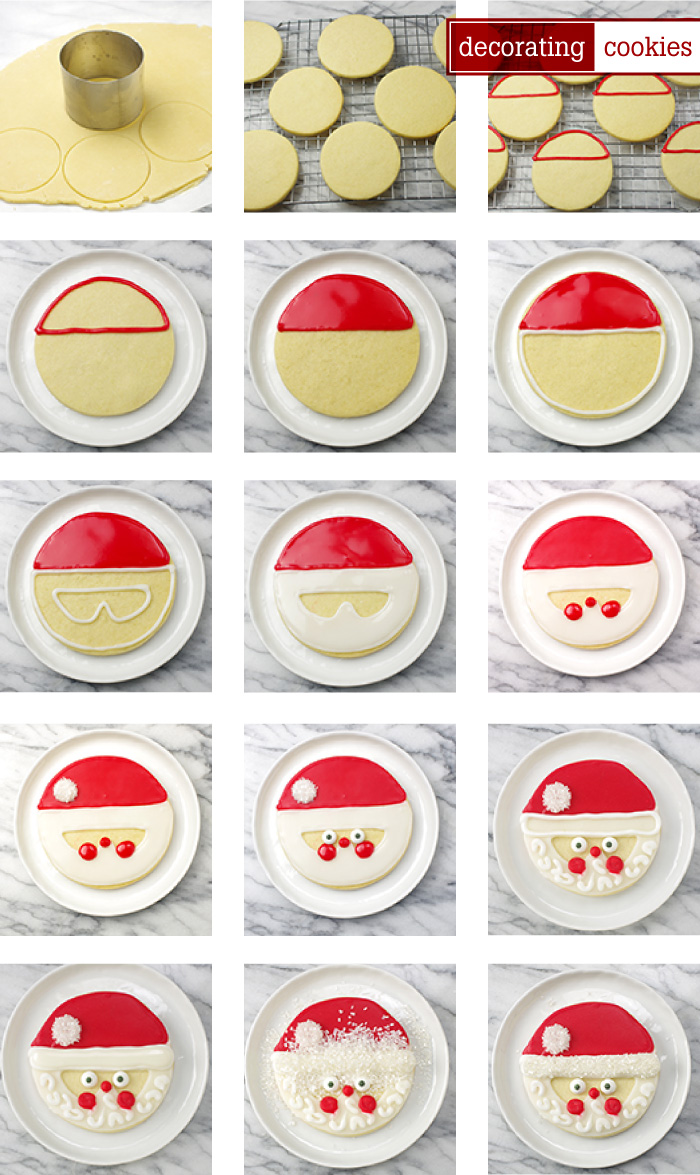
6. Remove two-thirds of the white icing to another bowl; place the remaining icing into a piping bag outfitted with a #4 tip for outlining the edges of the cookies. Check the consistency of the icing; it should be easy to pipe a line, and the line should spread just slightly, but more or less keep its shape.

7. In the other bowl, continue to add drops of milk to the larger portion of white icing until the consistency is more fluid for flooding. A ribbon of icing on the bowl should take 3-4 seconds to disappear into the surface. Cover tightly until ready to use.

8. With the other reserved portion of icing, add the red food coloring until the desired color is achieved, then continue to piping consistency by continuing to add drops of milk until the icing drizzled on top with the whisk is fluid but keeps the imprint.

9. Remove two-thirds of the red icing to another bowl; place the remaining icing into a piping bag outfitted with a #4 tip for outlining the edges of the cookies. Check the consistency of the icing; it should be easy to pipe a line, and the line should spread just slightly, but more or less keep its shape.

10. Continue to add drops of milk to the larger portion of red icing until the consistency is more fluid for flooding. A ribbon of icing on the bowl should take 3-4 seconds to disappear into the surface. Cover tightly until ready to use.

 
Santa's Sleigh  

Decorating and Embellishing:

Embellishment Ingredients:
White glitter sugar, or white coarse sanding sugar
Candy eyes, or a few chocolate chips

1. With the red piping icing, outline the hat area. Let dry for about 15 minutes, then flood the area with the red flooding icing.

2. After an hour or overnight, outline the hat fur and the beard with white piping icing. Let dry for about 15 minutes, then flood the outlined area with the white flooding icing. Allow to dry several hours or overnight.

3. Pipe a pom-pom on Santa’s hat with the white piping icing, and outline the fur brim again. Flood the fur brim with another layer of white flooding icing. While still wet, sprinkle on white glitter sugar, or coarse, white sanding sugar. Allow to dry, then brush away any excess glitter.

4. With the red piping icing, add rosy cheeks and a button nose.

5. Add candy eyes with a dab of white piping icing. Or pipe eyes with white piping icing. Allow to dry. Dot with a toothpick dipped in melted chocolate.

6. Add beard curls with white piping icing for the final touch!

 
Cookbook
Cooks'Wares | Springboro - Settlers' Walk - 937-748-4540 | Cincinnati - Harper's Point 513.489.6400
Copyright 2013 - Acorn Advisors