Cooks on Main
Naan

Naan
Makes 4 naan (each about 8 inches in diameter)

Naan is northern India’s classic flatbread. The dough is effortless and requires no rising time because of the absence of yeast. Naan is usually baked on the inner walls of a high-temperature, clay-lined oven called a tandoor. Here is my grilled version, so no need for a tandoor. (see Extra Credit for an oven version). Crispy, chewy, tender, and toothsome, these are perfect for single servings.

3 cups unbleached all-purpose flour,
   plus additional for rolling out the dough
2 teaspoons baking powder
1 teaspoon coarse kosher or sea salt,
plus extra for sprinkling
1 large egg, slightly beaten
Canola oil for brushing the dough
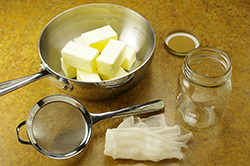
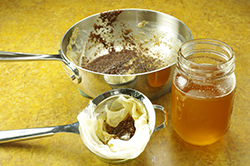
Ghee, (see below) for the finished naan

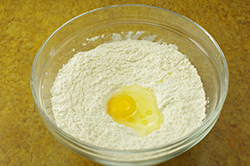
1. Thoroughly combine the flour, baking powder, and 1 teaspoon salt in a large bowl.

2. Pour the beaten egg over the flour mixture and quickly stir it in. The flour will still be very dry, with a few wet spots.

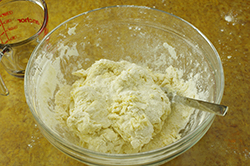
3. Pour 1 cup of warm tap water into a measuring cup. Drizzle a few tablespoons of the water over the flour mixture, stirring (you can use your hand – as long as it’s clean, I think it’s the best tool) it in as you drizzle. Repeat with a few more tablespoons of water until a soft, slightly sticky – but manageable – dough ball is formed. Watch the dough carefully; you don’t want it so sticky you have to add more flour to make it workable.

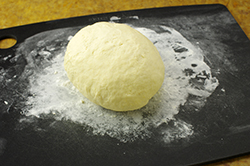
4. If you used your hand to make the dough, it will be caked with floury clumps. Scrape the clumps back into the bowl. Wash and dry your hands thoroughly, then knead the dough. (You’ll get a much better feel for the dough’s consistency with dry hands.) To knead the dough, dust your hands lightly with flour. Knead the dough to form a smooth, soft ball, 1 to 2 minutes.

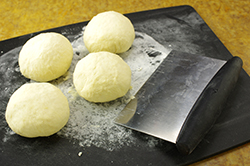
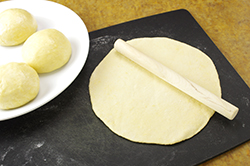
5. Divide the dough into 4 equal portions. Lightly grease a plate with oil. Shape one portion into a round resembling a hamburger bun and put it on the plate. Repeat with the remaining dough.

6. Brush the tops of the dough rounds with oil, cover them with plastic wrap or a slightly dampened cloth, and let them sit at room temperature for about 30 minutes. Allowing the dough to rest softens the gluten that has formed as you knead the dough. Gluten is what gives bread its structure, and when just formed, it has a tendency to spring back into a tightness, making it difficult to roll the dough.

7. Place a pizza stone or unglazed pottery tiles on a grill rack. If you are using a gas grill, preheat it to the highest heat setting. If you are using a charcoal grill, build an intensely hot fire so the charcoal turns ash-white and red-hot. The temperature should hover between 600° and 700°F. (See Extra Credit below for conventional oven baking instructions.)

8. Tear of a large piece of aluminum foil, fold it in half, and set it aside.

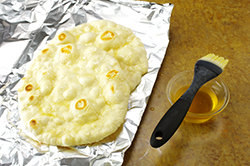
9. Lightly flour a small work area near the grill and place a dough ball on it. Press it down to form a patty. Roll the patty out to form a round roughly 3 to 5 inches [Editor’s Note: roll to 6-7-inches] in diameter, dusting it with flour as needed. Make sure the round is evenly thin, with no tears on the surface. Sprinkle a little coarse salt over the top, and gently press it into the dough. Lift the round and flip it salt side down, onto the hot pizza stone. Within seconds, the dough will start to bubble in spots. Cover the grill and cook until the dough turns crispy brown on the underside and the top acquires light brown patches, 2 to 3 minutes. Remove it from the stone, liberally brush the top with ghee, and slide it between the layers of foil to keep it warm.

10. Repeat with the remaining dough rounds, stacking them on top of the previously grilled naans.

Extra Credit:
It is hard to generate that same intense heat in a kitchen oven because they are not designed to go above 550°F, but you can bake the flatbread in an oven if you don’t have a grill (or if it’s snowing outside). If yours is a conventional oven, place the pizza stone on the lowest rack and preheat the oven to the highest temperature setting. A convection oven generates the same amount of heat but distributes it more evenly, so you can place the pizza stone on any of the racks. You will need to bake the bread a little longer than you would on an outdoor grill.


Ingredients

Egg in Flour

Mixing

Kneaded Dough

Four Balls Formed

Rolled Naan

Grilled Naan

Ghee
Indian-Style Clarified Butter
Makes about 12 ounces (1-1/2 cups)

Making ghee is not rocket science. If you can melt better, you can make ghee. Although ghee is widely available in stores, it is not easy on the pocketbook so be prepared to plunk down your hard-earned money for the convenience of ready made. I admit I occasionally splurge and buy ghee that is imported from India, only because the cows (or water buffaloes, depending on where the milk came from) graze on a different diet and the resulting ghee has a unique flavor not found in America’s dairy land. Ghee’s nutty flavor, the result of gentle browning, is the key taste in many of our dishes, and often even a mere tablespoon is enough to provide succulence. Since the Vedic times of the Indo-Aryan culture (more than six thousand years ago), ghee has played a role in many facets of Hinduism, including fueling the eternal flame associated with birth, marriage, and death. Ghee evolved when there was no refrigeration (actually, many Indians still don’t have

refrigeration today). Milk solids and water promote rancidity in butter, and when they are removed, gone is the need for a refrigerator. Middle Eastern and Arabic samneh is made the same way as ghee, as is smen from North Africa.

1 pound unsalted butter

1. Line a fine-mesh strainer with a piece of cheesecloth, set it over a clean, dry 2-cup glass measuring cup or pint-size canning jar, and set it aside.

2. Melt the butter in small, heavy-bottomed saucepan over low heat, stirring it occasionally to ensure that it melts evenly (otherwise, the bottom part of the block of butter melts and starts to bubble while the top half remains firm). Once the butter has melted, you will notice that a lot of white foam gathers on the surface. Scoop the foam out with a spoon or just let it be; the melted butter will eventually stop foaming. Now you can start to carefully skim off the foam. Some of the milk solids will settle at the bottom and start to brown lightly. This light browning is what gives Indian ghee its characteristic nutty flavor. The whole process will take 15 to 20 minutes.

3. Once the liquid appears quite clear (like oil) with a light amber hue, pour the butter through the cheesecloth-lined strainer, leaving the browned milk solids behind. Discard the solids and set the melted butter aside to cool.

4. When the ghee is cool, pour it into a storage jar (if you haven’t already strained it into one) and screw the lid tightly shut. Keep the ghee at room temperature, right next to your other bottled oils; it will solidify, even at room temperature (I don’t find it necessary to refrigerate ghee, but if you wish to, by all means do so. I have kept mine at room temperature for many months, without any concern for rancidity or spoilage. Because ghee has no milk solids in it, and that’s what can turn butter rancid, I do as millions in India do, and leave it out of the fridge.)

Extra Credit:
A few do’s and don’ts. First, don’t use margarine or any butter substitutes that want you to think they’re just like the real deal. Do use a heavy-bottomed pan to prevent the butter from scorching. Cast iron, stainless steel, carbon steel, and ceramic-coated cast iron are all fair game. In fact, I use a cast-iron or carbon steel wok if I happen to be making a large batch: the fat seasons the pan. Don’t turn up the heat beyond the low setting, as much as you may be tempted to do so; if you do, the milk solids in the butter will start to burn. Do make sure the glass jar for storing the ghee is clean and dry before pouring in the ghee. Moisture will promote the growth of mold. This is the same reason you should let the ghee cool completely before screwing on that jar’s lid.

You cannot deep-fry in butter because it has a low smoke point (that’s the temperature at which oil starts to smoke). However, remove the milk solids and moisture and you have elevated butter’s smoke point, making it safe for deep-frying (of course we are not talking about measuring fat calories when you do decide to splurge on foods fried this way).


Ghee Prep

Strained Ghee

Cookbook
Cooks on Main • 701.572.2665 • 224 main st. • williston, nd • 58801 • Copyright 2014• Acorn Advisors