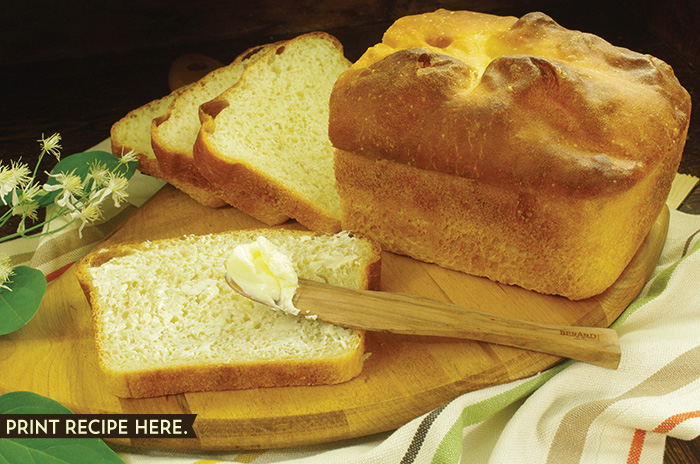
Your First Loaf of Bread
Makes 1 loaf
All right y’all, let’s get started. Don’t be a weenie; you have everything you need to do this. You don’t need any fancy anything – just flour, water, yeast, and salt. Basically you mix ‘em up, rub ‘em around in the bowl, leave it for a long time, then shape it into a log and stick it in a hot oven. What do you get? Your first loaf of delicious home-baked bread.
BE PATIENT, YOUNG BAKER. Read through the entire lesson before you actually do anything. Trust me – it will make the whole thing easier and better.
PLAN AHEAD: Good bread takes time, and there’s just no way around it. You spend 10 minutes mixing up your bread dough on day one, and then leave the dough in the fridge for a few days before doing anything else. So plan ahead, and invite someone over for dinner this weekend.
WILL I REALLY BE ABLE TO BAKE GOOD BREAD IN MY HOME OVEN? Say it with me now, “I AM a baker. I AM a baker. I AM A BAKER.” Don’t worry, even if your home oven isn’t the newest, fanciest oven in the world, chances are it’s fully capable of churning out some delicious loaves of bread. For the first couple of recipes you bake the loaves in bread pans, but after that you essentially create an oven inside your oven with a pizza stone and a metal pot or bowl. I’ve baked in tons of people’s home ovens, and I haven’t found one that couldn’t turn out a perfectly delicious loaf. So don’t stress about the oven; just make the bread.
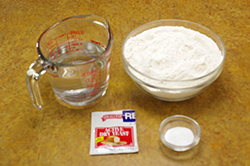
WHAT YOU’LL NEED:
3-1/2 cups bread flour (525 g)
2 tsp sea salt, fine grind, (12 g)
2-1/4 tsp yeast, active dry (7 g)
1-2/3 cups water (295 g), lukewarm (80°F/27°C)
TOOLS:
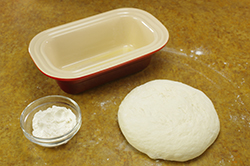
Measuring spoons, Measuring cups, Big mixing bowl (at least 6 in/15 cm tall and 12 in/31 cm wide), Plate or Plastic wrap (to cover bowl), Oil or nonstick spray, Loaf Pan (about 8 by 4 in/20 by 10 cm), Aluminum foil, Towel of Pot holders, Cooling rack.
1. Gather your foodstuff and tools. Get all the stuff that’s listed in the table.
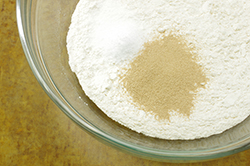
2. Measure the ingredients and mix them together. First do the dry ingredients: bread flour, salt, and yeast. When you’re measuring the flour, take your bag (or whatever your flour is in), dig into it with your measuring spoon, and “fluff” up the flour a little bit before you scoop it. Then dip your measuring cup in and get enough flour so that it’s piled high in your measuring cup. Use the back of a knife to scrape off the flour mound from your cup, leaving you with a smooth, level top. If you have a digital scale and want to weigh ingredients, go for it. Measurements of less than 3 tablespoons are often too small to register on a scale – depending on what you’re weighing. One teaspoon of yeast weights 3 grams, for instance, and 1/4 teaspoon of same less than 1 g, which most home scales won’t even register. In the case of these small measurements, I couldn’t give accurate weights – so scoop away!
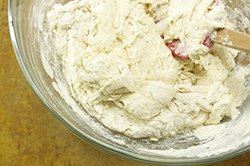
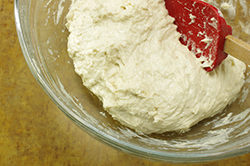
Pour them (bread flour, sea salt, and yeast) into a big mixing bowl, and stir them with your hand so they’re mixed evenly, and you can’t see any lumps of salt or yeast.
Then comes the water. . . . if you don’t want to take the water’s temperature, just use water that is lukewarm to the touch.
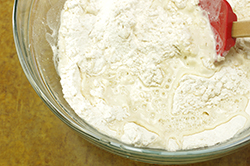
Pour in the water, rollup your sleeve, and mix it all up with your hand. Mush it up real nice, grabbing it and squishing it through your fingers. You just want to get things mixed evenly, so all of the dough looks the same and there isn’t any dry flour left. It should be the consistency of a really wet playdough. This’ll take only 30 seconds or so.
If you’ve mushed it up real nice and there is still some dry flour left in the bowl, add another 1 or 2 Tbsp of water and mix it in. If the dough is more liquidy than a really wet playdough, add 1 or 2 Tbsp of flour.
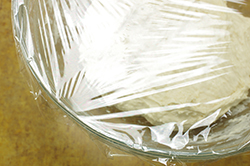
3. Let the magic happen. Cover the bowl with a plate or some plastic wrap so moisture can’t sneak out, and leave it alone for about 3 hours at room temperature. By this point, the dough should have blown up like a balloon to about twice its size. Now put it in your fridge, and leave it there for at least a day, but anywhere up to a week is fine. (If you’re feeling ridiculously impatient, 3 hours is the absolute minimum time it will take for your dough to cool down, and it’s much easier to work with when it’s cold.) The longer it stays in the fridge (up to a week), the better the flavor will be, as you’re giving the yeasts time to create all sorts of delicious flavors in your dough.
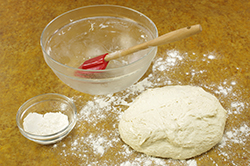
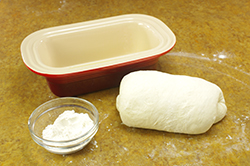
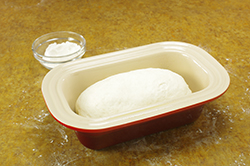
4. Shape into a loaf. Oil or spray the inside of your loaf pan, then take your dough out of the fridge. It will be a little sticky, but don’t worry – this is the way it should be. Just sprinkle a small handful (about 2 Tbsp) of flour on your countertop and on top of the dough in the bowl. Tip the bowl over, and gently squish the dough out. Sprinkle another little bit (1 Tbsp or so) of flour on top of the dough so it doesn’t stick to your hands, and flatten the dough into a circle. Fold the left side of the dough into the center, then fold in the right side, and then gently roll the dough into a log, and plop it into the loaf pan with the smooth side facing up.
5. Let the loaf rise. Spray or brush the top of the loaf with oil (so the foil doesn’t stick to it), and then cover the loaf with aluminum foil. Tent the foil so that there’s room for the dough to rise about 2 in/5 cm.
Now for the hard part: Leave it alone for about 4 hours. Put it somewhere out of the way so it won’t be disturbed, like on top of your fridge or just on a shelf in your kitchen. If you can’t bake it in 4 hours, let it sit out for a couple of hours, then put it back in the fridge for anywhere from 1 to 3 days (exact timing doesn’t matter here.)
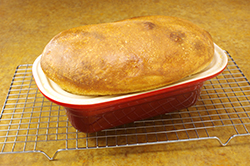
6. Bake that baby. If your loaf has been in the fridge, take it out so it can warm to room temperature while the oven preheats. Put one of the racks in your oven to the middle height. Turn on your oven to 475°F/240°C, and let it preheat for at least 20 minutes. Take your loaf, complete with aluminum foil covering, and put it in the oven for 20 minutes. At this point, open up your oven, take off the aluminum foil, and get excited – your dough is turning to bread! Bake for another 20 minutes, and take a look – if the top is a nice dark brown, take it out. If not, leave it in for another 7 or 8 minutes.
7. Let that sucker cool down! For real; you’re just gonna burn your mouth if you eat the bread when it’s too hot. Use a towel or potholders to take the bread out of the pan (if it sticks in the pan, use a spatula or butter knife to gently loosen it). Leave the bread on a cooling rack or lean it against something so air can flow around it while it cools. It’s best to let it cool for an hour, but I know you . . . . Just wait 30 minutes and eat the whole thing. |
|


|