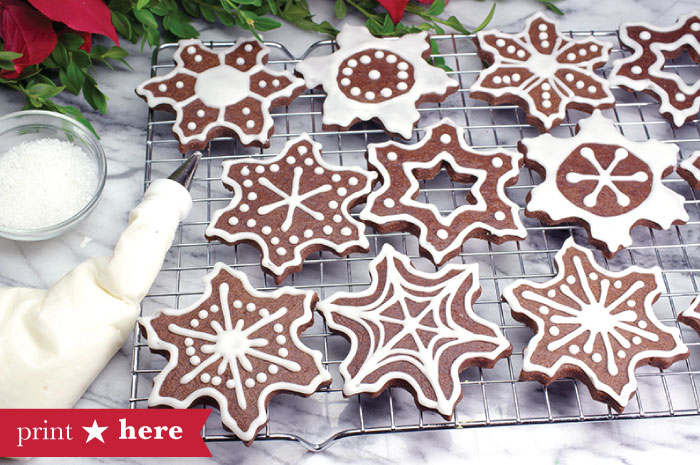
Chocolate Snowflakes
Makes about 40 snowflakes, 4-inch
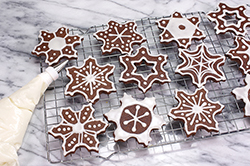
Snowflakes that are part of a holiday cookie plate are, perhaps, the only kind of snowflake welcomed! Using a chocolate cookie dough, intricate snowflakes are formed and embellished with vanilla frosting piped and flooded. The chocolate masterpieces stand out as lovely presentations on the dessert buffet, or when bagged individually as holiday treats for sharing.
Ingredients:
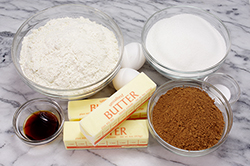
1-1/2 cups (3 sticks) unsalted butter, room temperature
2 cups sugar
2 eggs
1 tablespoon vanilla
4-1/2 cups all-purpose flour
1 cup cocoa powder
1 teaspoon salt
Directions:
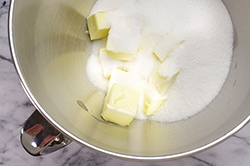
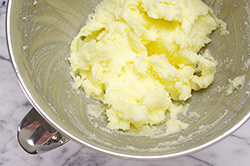
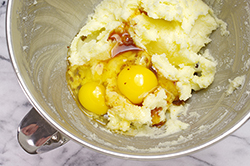
1. In a large bowl or the bowl of a stand mixer, combine the butter and sugar together and mix until the consistency is light and fluffy. Add the eggs and vanilla extract; mix until well blended.
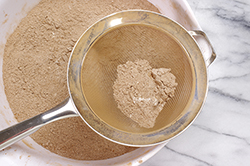
2. Sift the flour, cocoa powder, and salt in a medium bowl; stir to mix evenly. (We usually don’t sift flour, but cocoa powder can be notoriously lumpy; sifting the cocoa with the flour is a worthwhile step.) Add the flour-cocoa mixture, one-third at a time, to the butter-sugar mixture on low speed until thoroughly mixed.
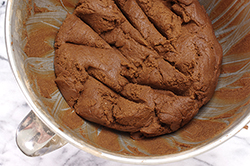
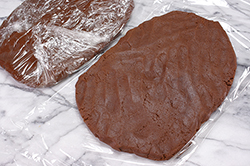
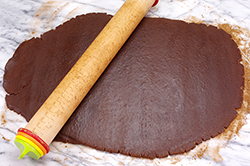
3. Gather the dough into a rough ball, and divide in half. Flatten each half into an oval shape that’s about 1/2-inch thick. (The oval shape will be helpful in the next rolling step.) Wrap each oval well and chill for an hour or up to 3 days. The dough may also be frozen at this stage for later use.
4. Remove a dough disk from the refrigerator and allow to soften slightly at room temperature until it is rolls out easily to a 1/4-inch thickness using a pastry mat or piece of parchment paper as a rolling surface. Dust with cocoa powder as needed, but sparingly so. Re-chill the rolled out dough for 15-20 minutes. Chilling will help cut and retain detailed shapes in the next step. Repeat with the second disk.
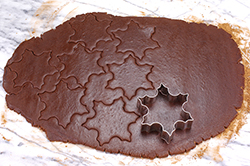
5. Cut out shapes from each chilled, rolled sheet of dough. Place the shapes, leaving space in between each cookie, on a lined baking sheet (lined with a silicone baking mat, or parchment paper), and chill in the refrigerator for 15-20 minutes before baking; this will minimize spreading in the initial baking helping to retain the detail of the shapes.
6. Combine scraps from the first cutting of both sheets and roll out again, chill, and cut additional shapes. Repeat until all the dough is prepared. (The less re-rolling of dough, the better; the cookies will be more tender).
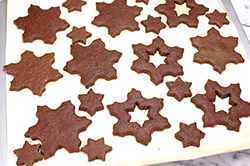
7. Preheat the oven to 350°F. Bake the chilled, cut-out shapes for 12-14 minutes or until a light fingertip press in the center of the cookie springs back. (For smaller cookies, bake for less time.)
8. Allow the cookies to set by cooling on the pan for 5 minutes, then transfer to a cooling rack for completion of the cooling. Cooling on a rack allows the cookies to crisp and resist excess moisture retention that might make them soggy.
9. Once completely cooled, the cookie shapes may be stacked and stored in an airtight container until time to decorate.
Vanilla Cookie Icing
Make about 1-1/2 cups.
(Based on your decorating plan, two batches of icing may be required)
This simple icing works well for both piping and flooding on cookies; it retains a shininess on the finished cookies that we love.
Ingredients:
2-1/2 cups confectioners’ sugar
2 tablespoons light corn syrup
1/2 teaspoon pure vanilla extract
1 - 2 tablespoons whole milk
Directions:
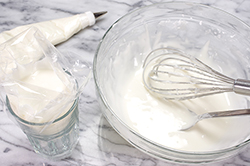
1. Sift the powdered sugar into a mixing bowl to remove any lumps or hard pieces.
2. Add the corn syrup, vanilla extract, and 1 tablespoon of the milk. Whisk together by hand to combine. (To minimize air bubbles, mix by hand; avoid using a hand mixer or stand mixer for this step).
3. Add additional milk a half-teaspoon at a time until the icing is mixed thoroughly, yet quite stiff.
4. Divide the icing into two separate bowls, one for piping and one for flooding.
5. Piping Icing: White icing will be used to pipe outlines on the snowflakes. Add drops of milk until the icing is fluid, yet when drizzled on top keeps the imprint for about 7 seconds; this is known as a 7-second ribbon. Outline cookies and designs with a #4 round tip. Check the consistency of the icing; it should flow nicely and be easy to pipe a line; the line should spread just slightly, but more or less keep its shape. If your snowflake design features only piped designs, add any glitter or coarse sanding sugar at this stage while the piping icing is still wet.
6. Flooding Icing: Add drops of milk to the icing until the consistency is fluid for flooding. A ribbon of icing on the bowl should take 3-4 seconds to disappear into the surface. Depending on your snowflake design, flood the outlined areas as desired. A toothpick or the back of a tiny spoon is handy for spreading the icing into corners and reaching all the outlined areas.
7. Embellishments: Add embellishments to flooded areas as desired while still wet. Experiment with food glitter, nonpareils, dragées, or your choice of fun! |