|
| |
| |
|
|
|
| "Fresh, Better Bread" |
|
| |
October 15, 2009 |
| |
In This Issue |
|
Better than Sliced Bread! |
|
Fast Slow Bread
Reviving Bread Making
Mastering Measuring
Smart Bread Making Tips
Q & A's
Cookbook Review
No-Knead Fresh Bread Recipes
|
What’s better than sliced bread? Unsliced bread, of course! Fresh bread that you’ve mixed and baked yourself! Today’s trend in homemade breads revives and builds upon some very old bread making traditions. Now artisan breads are available from your kitchen, fresh from your oven, with a minimal amount of effort. 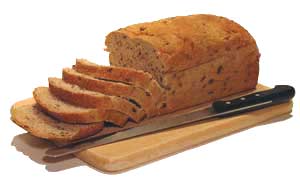 The new method harnesses the special powers of yeast to do the heavy, messy work of risen breads. We think you’ll prefer it over “boughten” bread, even if you live near a terrific bakery. In this issue we explain the science behind the new method for making artisan breads at home, and offer some advice about measuring and bread baking tools. We complete the issue with three bread recipes from Kneadlessly Simple by Nancy Baggett. You will love the ease of these recipes, but you’ll love the results even more – wonderfully flavorful, hot, fresh bread that you’ve made yourself! The new method harnesses the special powers of yeast to do the heavy, messy work of risen breads. We think you’ll prefer it over “boughten” bread, even if you live near a terrific bakery. In this issue we explain the science behind the new method for making artisan breads at home, and offer some advice about measuring and bread baking tools. We complete the issue with three bread recipes from Kneadlessly Simple by Nancy Baggett. You will love the ease of these recipes, but you’ll love the results even more – wonderfully flavorful, hot, fresh bread that you’ve made yourself!
|
Faster Bread by Slowing Down |
Throw all of the assumptions you’ve had about making yeast bread out the window! Instead, become acquainted with the slow-rise, no-knead bread baking method! The emphasis on making great bread has shifted from a very physical, labor-intensive process on the one hand, and from one-step bread machines on the other hand, to something much simpler and infinitely more flavorful.
The Science Behind Slow-Rise, No-Knead Bread – Far from being a gimmick, the slow-rise, no-knead method of bread making calls on the power of yeast to accomplish 99% of the work.
Bread, (and Wine and Beer) – They’re all dependent on yeast for their existence! Baking yeast is a one-celled, live organism, Saccharomyces cerevisiae, that’s officially part of the Fungi classification. Yeast loves sugar! As it devours the sugars present in any carbohydrate ingredient, carbon dioxide is formed as a gas. The gas bubbles create the fizz in beer and the texture of baked bread as the strands of dough become immortalized around the bubbles during baking.
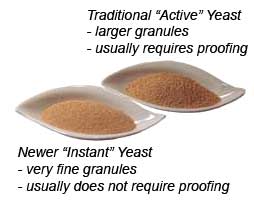
Newer, “Instant” Yeasts – The first secret of today’s artisan bread methods ifing step ensured that the yeast was viable and ready for work). Instant yeast granules are smaller in size and do not require proofing. They are produced and packaged such that their viability is quite reliable. In most slow-rise methods, the instant yeast is added to the dry ingredients and dissolved as the wet ingredients are added. Instant yeasts are also used in bread machine methods of bread making.
A Cold First Rise – The second secret of new bread baking is a cold first rise, also known as “delayed first fermentation.” Cool refrigerator temperatures surrounding the just mixed bread control the yeast’s exuberance to a very slow pace. Meanwhile, the wet ingredients have time to work on the flour breaking it down to simpler forms and allowing its natural enzymes to be released. The result is incredible flavor that comes only from a cool “delayed first fermentation.”
A Cool Second Rise – Following a vigorous, quick stir, the second rise of the dough is accomplished in cool room temperatures for up to 18 to 24 hours. The second rise happens slowly because of the initially cold dough. As the yeast does its work, the all-important strands of gluten are formed, stretched, and developed. It’s this second, elongated rise that takes the place of kneading. The cookbook author featured below calls this “micro-kneading.”
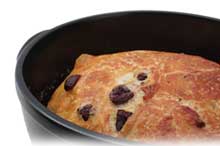 |
Bread Baked in a Casserole Dish |
Baking the Bread – The baking of homemade bread is perhaps the best air freshener a home could have! About 30 minutes into the 60-75 minute bake time, the aromas begin to envelop the kitchen and permeate throughout the house. Slow-rise, no-knead breads will generally take longer to bake than traditional yeast breads. An instant-read thermometer registering 200°F at the bread’s center indicates doneness.
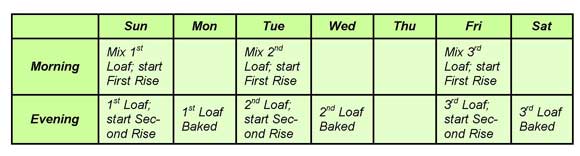
Schedule Elasticity – So far, hands-on time has included five minutes for the measuring and mixing, and one minute for stirring after the first rise – six minutes in total! However, the elapsed time has been anywhere from 24 to 36 hours. Allowing the dough to rise slowly in cool conditions not only yields a wonderfully tasting loaf of bread, but a lot of elasticity in the schedule. While the slow-cool-rise processing may seem like an exercise in delayed gratification, it can become an easy routine to have the next loaf in motion at all times. Here’s how we’re experimenting with the slow-rise method:
Interested in learning and experimenting more with slow-rise, no-knead bread? We recommend Kneadlessly Simply by Nancy Baggett, (featured below), or Peter Reinhart’s The Bread Baker’s Apprentice, or Artisan Bread in Five Minutes a Day by Jeff Hertzberg and Zoë François. |
|
Reviving Bread Making at Home |
You’re asking, what’s the catch? Great, fresh bread with 5-6 minutes of hands-on work? It’s just that simple – just a few common ingredients and a couple common kitchen tools.
Tool Simplicity -- The gear list for a basic, slow-rise bread includes exactly six tools:
 |
Use a sturdy stirring spoon, wood or metal |
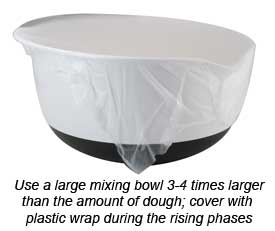
(1) Large mixing bowl
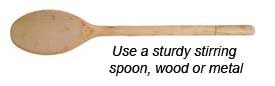
(2) A sturdy mixing spoon
(3) One-cup measure
(4) Teaspoon measure
(5) Baking pan or surface
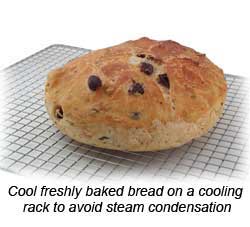
(6) Cooling rack
|
That’s it! Even the simplest of equipped kitchens can become a fresh bread baking factory! One of the stated reasons for not making yeast breads is the mess that arises during the process. The sticky kneading board or countertop, the fine dust of flour flown about the kitchen during kneading, or the yeasty dough underneath one’s fingernails, etc., etc. With this method, initial clean-up is limited to the mixing spoon, a one-cup measure and a teaspoon measure. How much easier could it get?
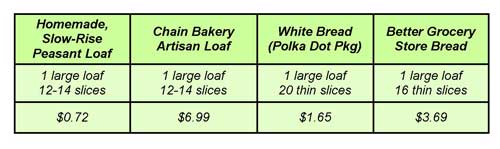
Dollars to Pennies – It would be difficult to drive to your local bakery, wait in line, and drive home in less than 5-6 minutes, but if time and flavor doesn’t convince you to try this bread making method, perhaps cost will. We added up the cost of the ingredients in the first recipe below and compared it to some other bread choices:
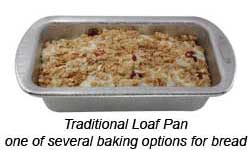
The Baking Pan – Not all bread needs to be baked in a loaf pan, though they certainly work quite well. Bread can be baked in a free-formed, round loaf and baked on a cookie sheet. Many of the recipes we explored called for using a Dutch oven or a lidded casserole dish. The heavy cast iron or ceramic character of these pans suits bread baking perfectly with their special heat transfer capabilities.
Serving Fresh Bread
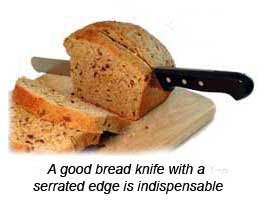
If you’re a newbie to serving fresh-from-the-oven bread, you’ll find that it may be difficult to cut when hot. It’s perfectly fine to allow family or guests to tear a piece of bread from a fresh loaf. Or, allowing the bread to set a few minutes will make for easier cutting. A true bread knife is invaluable for slicing fresh bread. Choose a knife that has a serrated edge and is long-enough to match a typical loaf of peasant bread – at least a 10-12” blade length.
|
|
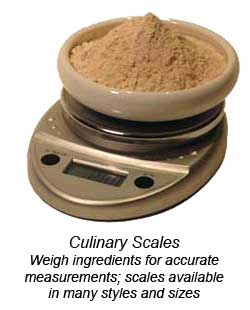
In a carpenter’s world the saying goes, “Measure twice, cut once.” Bakers don’t quite have the chance to measure twice, so it’s best to get it right the first time! Having accurate 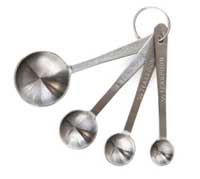 measuring tools is the first step. It’s amazing how many measuring tools are inaccurate in their construction. Choose tools that are from a reputable manufacturer. We have several styles of cups and spoons that we recommend and would be happy to point out their different features. measuring tools is the first step. It’s amazing how many measuring tools are inaccurate in their construction. Choose tools that are from a reputable manufacturer. We have several styles of cups and spoons that we recommend and would be happy to point out their different features.
Measuring Liquids – To measure liquid ingredients, use a glass or plastic cup that has accurate markings and features a spout for pouring. When measuring make sure to “read” the liquid’s level horizontally from eye level. If the angle of your view is not level, your measurement will be off. Use a small rubber or silicone scraper to fully empty the measuring cup. For very viscous liquids like honey or molasses, oil the inside of the measuring cup; the sweet liquid will slip out easily without leaving any product behind.
 |
Measuring Dry Ingredients – To measure dry ingredients, use graduated or nested measuring cups. They may be made of plastic, ceramic or stainless steel. We like measuring cups that have permanent markings embossed on their handles or sides. Painted markings may disappear in time with dishwashing and handling. With accurate tools in hand, a correct technique is also required. Here are a few tips for accurately measuring some common bread ingredients.
• Powdery Textures – (Flour, Baking Powder, Baking Soda, Confectioner’s Sugar) – Stir or lightly fluff the powder in its container. Spoon the powder into the measuring cup. Fill to overflowing, then scrape off any excess so that the contents are level with the top of the cup. Do not pack, tamp down, or allow it to settle. Also, do not scoop powdery ingredients with the measuring tool; this has the effect of packing the ingredients causing too much to be used.
• Granulated Textures – Sugar, Salt – Simply pour or spoon into the measure and level off.
Measuring by Weight – Measuring ingredients by weight is a well-used method in commercial kitchens and in international cultures. We often prefer weighing ingredients when baking because it is so easy to add ingredients according to the scale’s display without measuring cups or spoons. Convert your favorite recipes from volume measurements to weight measurements and simplify your life. The density of the ingredient will affect the volume-to-weight calculation; use the Nutrition Information table on the ingredient’s packaging where the volume-to-weight conversion for the product is listed.
|
Smart Slow-Rise Bread Making Tips |
Tip #1: Upon discovering your new favorite bread, mix several batches of the dry ingredients and store in a zipper bag. Write a card with the remaining ingredients listed, the baking temper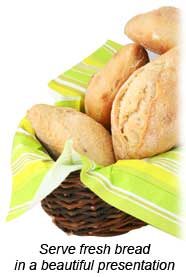 ature and time noted, and tape it to the bag. The next time you are ready to mix a loaf, it will take you only two minutes and only one spoon to wash! ature and time noted, and tape it to the bag. The next time you are ready to mix a loaf, it will take you only two minutes and only one spoon to wash!
Tip #2: Showcase your fresh bread in a bread basket, or on a cutting board draped with a beautiful tea towel. Baskets and fabric will allow steam to be released while keeping your bread warm.
Tip #3: Slow-rise, no-knead breads seem to use a smaller quantity of yeast than other yeast bread recipes and usually less than a single envelope. Consider buying a jar of yeast that allows you to use just what you need and avoids a half-used packet.
Tip #4: Yeast is a dormant, one-celled organism that “comes alive” when in contact with water. To ensure freshness, always check the expiration date when purchasing. Unopened yeast packages may be stored in a cupboard; opened packets or jars should be stored tightly closed in the refrigerator.
Tip #5: Within 5 minutes of removing the bread from the oven, turn the bread out of its pan and place on a cooling rack. This will prevent the outside of the bread from getting wet from steam condensation as the bread cools.
Tip #6: Slow-rising bread asks the yeast to work for a relatively long period of time. However, there are limits to yeast’s tolerance – at some point, the yeast can become expended and fail to rise – call it post-party exhaustion. Over-fermentation can be avoided by cooling the dough for more of the rising period, and acting within the 24-36 hour window.
Tip #7: Keep extra sets of measuring cups and measuring spoons in your utensil drawer. This will allow you to keep baking without having to wash or rinse a measuring cup or spoon for the next ingredient. Extras will also allow you to avoid reaching into a dirty dishwasher during the next recipe.
|
|

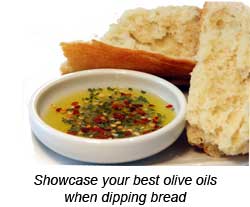
Q: What is the proper etiquette when dipping bread in oil?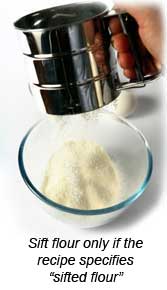
A: Dipping oils are a great way to enjoy fresh bread while substituting healthier oils for butter. Tear off a bite-sized piece of bread and dip in oil. Do not dip an entire slice of bread in the oil, and certainly do not “double-dip” the slice after having bitten off a piece.
Q: What is the difference between all-purpose flour, bread flour, cake flour, and self-rising flour?
A: All-purpose flour is for general use in any recipe unless specified otherwise. Bread flour is made from hard wheat which has a higher protein content and greater percentage of gluten. Cake flour is flour with a low protein content and only half the glutens of bread flour. Cake flour produces a fine, very tender product in baking, but it is not suitable for bread making; use it for cookies and cakes. Self-rising flour is pre-mixed flour containing baking powder and salt and is more suitable for making quick breads, (pancakes, muffins, waffles), than yeast breads.
Q: What is a dash? A pinch? A smidgen?
A: Many baking recipes call for a dash, pinch or a smidgen. According to most, a dash is 1/8 tsp., a pinch is 1/16 tsp., and a smidgen is 1/32 tsp. And yes, there are measuring spoon sets available for a Dash, Pinch and Smidgen!
Q: Why the emphasis on the feel of the dough?
 A: Flour varies in the amount of moisture that it can hold based on local weather conditions, the type of flour, or the way in which flour was measured. Some say the amount of flour used can vary up to 25%. Becoming comfortable with the feel of the dough provides a guidepost for achieving the desired outcome. A: Flour varies in the amount of moisture that it can hold based on local weather conditions, the type of flour, or the way in which flour was measured. Some say the amount of flour used can vary up to 25%. Becoming comfortable with the feel of the dough provides a guidepost for achieving the desired outcome.
Q: Does sifting affect the measurement of flour?
A: Yes! A cup of sifted flour will weigh approximately 4 ounces. In contrast, one cup of unsifted flour will weigh 4.75 ounces – a 18+% difference! If the recipe calls for sifted flour, most definitely sift the flour. If the recipe does not specify sifted flour, then spoon “fluffed” flour (see above) into the measuring cup and level off. In the “olden days” flour was routinely sifted to break up clumps of flour and to remove hard bits. Today’s flour quality does not require sifting unless specified by the recipe.
|
|
Kneadlessly Simple, Fabulous, Fuss-Free, No-Knead Breads by Nancy Baggett. Copyright 2009. Photography by Alexandra Grablewski. Published by John Wiley & Sons, Inc, Hoboken, NJ.

True to its title, this cookbook takes us down a new pathway for making bread. And while there are several takes on cool, slow-rise bread baking, we found this book particularly accessible in its instructions and breadth of adapted recipes. Ms. Baggett expertly explains the chemistry behind the chilled temperatures and the elongated rising times. We especially appreciated the flexible schedule that she builds into each recipe; she clearly understands real life and last minute changes to the agenda. The cookbook starts with easy, yet delicious, recipes designed to train the renewed bread baker in the new method. From there the variations break out in several directions. She covers American Favorites, Old-World Classics, Whole and Multi-Grains, Gluten-Free Breads, and Sweet Breads. A great trouble-shooting section provides a safety net and confidence for the experimentation ahead. The book ends with expert guidance for converting your own beloved bread recipes to the cool, slow-rise method. We can’t wait to try the Cinnamon Sticky Buns and the Rosemary Focaccia!
|
Recipes for Fresh, Better Bread |
Recipes excerpted from Kneadlessly Simple, Fabulous, Fuss-Free, No-Knead Breads by Nancy Baggett. Copyright 2009. Published by John Wiley & Sons, Inc, Hoboken, NJ. Reprinted with permission of the publisher. All rights reserved.
 Crusty White, Peasant-Style Pot Bread Crusty White, Peasant-Style Pot Bread
View & Print
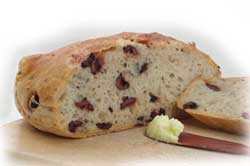
This was our first attempt at using the cool, slow-rise method of bread-making. We added a cup of kalamata olives as suggested in one of the variations. It was a huge success! Not only was it incredibly easy, the result was extremely rewarding! The recipe produced a well-rounded loaf with a beautiful golden crust. The taste and texture was divine! We plan to make this bread again and again.
Great Granola Breakfast Bread
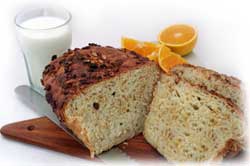 View & Print View & Print
Bolstered by our first round of success, this recipe sounded wonderful and we were right! Easily mixed, as promised, the bread had just the slightest hint of sweetness. The added granola provided some extra texture. We thoroughly enjoyed it when it was warm, and possibly even more when it was toasted. Buttered toast and a glass of milk - breakfast nirvana!
Crispy Roasted Garlic and Parmesan Pot Bread
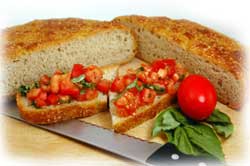 View & Print View & Print
Another winner! We roasted the garlic earlier when the oven was on and had the garlic/cheese paste ready to mix into the dough ahead of time. The dough took all of five minutes to make, and another minute to tend the next day. The baked bread had a rich, yet not overwhelming, garlic and cheese flavor that made the perfect bruschetta base and a fantastic garlic toast. Yummm...
|
| |
We hope you enjoy rediscovering fresh, homemade bread!
Chris Beykirch and All of the Staff at Love to Cook
Love to Cook
1211 N. Main Street
Logan, UT, 84341
435-752-9220/888-GADGET9
www.luvtocook |
|